Pelican 1510 vs SKB iSeries 2011-7
in Review
This blog post is meant to act as a supplement to the video linked above where I compare Kodak TMAX 400 and Ilford Delta 400 Pro. The main purpose of this post is to include images so that you’re able to better see the differences that I mentioned in the video. All images are as scanned and unedited.
Click on the thumbnails to see a larger image. The first image will always be of Kodak TMAX 400 and the second image will always be of Ilford Delta 400 Pro.


If you're considering on buying any of the products mentioned, please support my work by using the links below.
Kodak TMAX 400 https://amzn.to/2HeqRWe
Ilford Delta 400 Professional https://amzn.to/2XFjayb
Nikon N2020 https://amzn.to/2PC53oX
Nikon N90S https://amzn.to/2CMR39i
Nikon 50mm f/1.8D https://amzn.to/2CMEPxk
Ilford DD-X Developer https://amzn.to/2PxtUdG
Ilford Ilfostop https://amzn.to/2yFBhIO
Ilford Rapid Fixer https://amzn.to/2CP7QIw
Want to support my work?
Consider visiting the shop and buying "Absolutely Nothing" https://www.TheUpperLeftUSA.com/shop/absolutely-nothing
or
Become a Patron!
https://www.patreon.com/HaiHoangTran
I’ve largely been unhappy with my process for color correcting C-41 scans so I searched online to see what other people were doing. After going through a few Google pages, I came across a post on iamthejeff.com titled The best way to color correct C-41 negative film scans. In short the author developed a really quick way to color correct C-41 negative scans that from personal experience, seems to work very well. If you’re in need of a similar process, check out the video above where I go through iamthejeff’s process for color correcting C-41 negative film scans.
This process of color correcting C-41 film scans is straight forward, easy to do and quite effective. From my experience with this process so far, it pretty much works with every scan that I’ve thrown at it but there are a few drawbacks. The first being that some scans are a bit more tricky to color correct if there are elements that introduce multiple color shifts to the scene. Really, I don’t put too much fault on this process because images like the last one that I demonstrated on in the video is difficult to edit with any process that I’ve tried. Most processes, like this one, use global adjustments that effect all colors of an image. This will get the job done in most cases but some images will need further refinement with local color adjustments.
Another thing about this process is that it kind of requires the editor to know how a certain scene is supposed to look in terms of color. For example, that last image again. I knew what the jacket was supposed to look like, it’s suppose to be off white. However, using this process I could only get the jacket to look somewhat beige or a light tan. Someone else editing this image may not know better and might stop at that. To me, it’s difficult to color correct with this process without having a good idea of what the colors should be. So in cases where you are not editing your own scans or you just completely forgot what the scene was suppose to look like, things may not look true to life.
Edited with just iamthejeff’s process
Further edited to remove the color cast
Lastly, this is a process that you want to utilize when you want natural accurate tones, not so much for accurately representing a film stock. Think of it this way, some film stocks just inherently have a color shift. Some are just more green or more magenta than others or real life and if you want to accurately represent these film stocks, you have to show the color shift. Unless you have a really good photographic memory for just how much of a certain tint a film stock is supposed to have, it’ll be really hard to represent that with this process. Some other color correction programs utilize an entire database of different film stocks to cross reference in order to make all scans of a film stock look a certain way. That is obviously not the case with this process. Here, we are only looking at each image individually and apply color correction base on how we interpret each image, essentially just eye balling it and making adjustments based on personal preference. So, at the end of the day, all film stocks will largely look like each other in terms of color when using this process. Again, this process should not to be used to accurately represent the colors of a film stock. This process should be used for getting even, natural tones.
At the end of the day though, this is a free process shared for anyone to use. If you don’t like it, no harm done because you didn’t pay anything for it. Me personally, I will probably continue to use this process as a first step to color correct all of my C-41 scans. This process is very fast and it gets me to a place that I’m happy with and can do further adjustments upon. If you’re looking for an easy and fast way to color correct C-41 negative scans, definitely give this process a try.
Unfortunately, the original creator of this method has taken his website down but an archive of it along with a download link of the action can be found here: https://web.archive.org/web/20170702193137/https://www.iamthejeff.com/post/32/the-best-way-to-color-correct-c-41-negative-film-scans
Want to support my work?
Consider visiting the shop and buying "Absolutely Nothing" https://www.HaiHoangTran.com/shop/absolutely-nothing
or
Become a Patron!
https://www.patreon.com/HaiHoangTran
Want to support my work?
Consider visiting the shop and buying "Absolutely Nothing" https://www.HaiHoangTran.com/shop/absolutely-nothing
or
Become a Patron!
https://www.patreon.com/HaiHoangTran
My main, every day use lens for the past few years has been the Sony 24-70mm f/2.8 GM. This lens is on my camera body 99% of the time and is my go to for a one body and one lens setup. That being said, it is still relatively large and there are times that I don’t want to carry it around. For a paid job? No problem. I’ll deal with the size and weight all day, if I was making some money. But sometimes when I’m just walking around and want to bring a camera along with no pressure to take any photos, this can be a hassle. So, I’ve been in the market for a smaller and lighter weight lens. That’s why I picked up the Samyang 35mm f/2.8 autofocus lens for the Sony E-mount.
I’ve been using this lens for a few weeks now and want to share with you some of my thoughts as well as some samples from the various occasions that I’ve had the chance to use this lens. I just want to make it clear that this is not a pixel peeping review. I did not shoot test charts or go out and purposely try to find imperfections like chromatic aberration or distortion with this lens. I just shot it how I normally would and if I noticed something, I’ll mention it. Remember, the things that I say are my personal opinions and are based on how I used this lens. Your mileage may vary.
It should be noted that there is both a Rokinon and Samyang version of this lens. These are essentially the same company that produces some of the same lenses. I personally bought the Samyang version because it’s typically cheaper, but if you’re interested in the Rokinon version, just know that it is the same as the lens that I’m reviewing.
Although retail price for this lens is $399, it regularly sells for around $250. Let’s face it, just based on the price, you shouldn’t really be expecting amazing construction quality or premium build materials. This lens is made out of plastic and there is really no questioning of that. To be honest, the first time that I picked this lens up from the case, I thought to myself that “Man, this feels like crap.” You can tell right away that it’s made out of plastic and it’s not like one of those things that are made out of plastic but the manufacturer finished it in a way that the surface is kind of cold and feels like metal. No, this feels as plastic as plastic can feel. But again, for the price this is kind of expected.
One thing that I do want to mention with this lens is the hood. I actually really like the design of the hood in concept. How well it works? I can’t say considering that it’s so small, but it looks good and is a great cosmetic design. My problem with the hood however, is its fitment. It is very lightly held in place and takes little to no effort for it to come off. Just the slightest bump and it could possibly fall off. I feel that through my normal use of the lens, I constantly have to re-tighten the hood because I see it unscrewing after almost every shot. I’m actually thinking of just adding some tape between the hood and lens just to make the fitment tighter. Hopefully, this will help.
Again, this is a lens that regularly sells for around $250. Don’t expect the world of it. However, if you purchase it with reasonable expectations, I think you’ll be quite satisfied because the cheaper materials do make this lens very light. Sitting at 85.6 grams, this is without a doubt the lightest lens that I’ve ever held in my hands (that actually performs well). It feels like I just have the lens cap on the body and that’s great for what I was looking for, a small, compact and lightweight lens. A complete winner in that sense.
Considering that this is a third party autofocus lens for Sony E-mount, you’re probably wondering how well the autofocus performs. Again, I didn’t do any scientific tests so what I’m about to say is strictly an opinion. That being said, I’m completely satisfied with AF performance because it gets the job done and that’s about it. For the most part, it just works.
Samyang 35mm f/2.8 AF Photo Mode AutoFocus
Samyang 35mm f/2.8 AF Video Mode AutoFocus
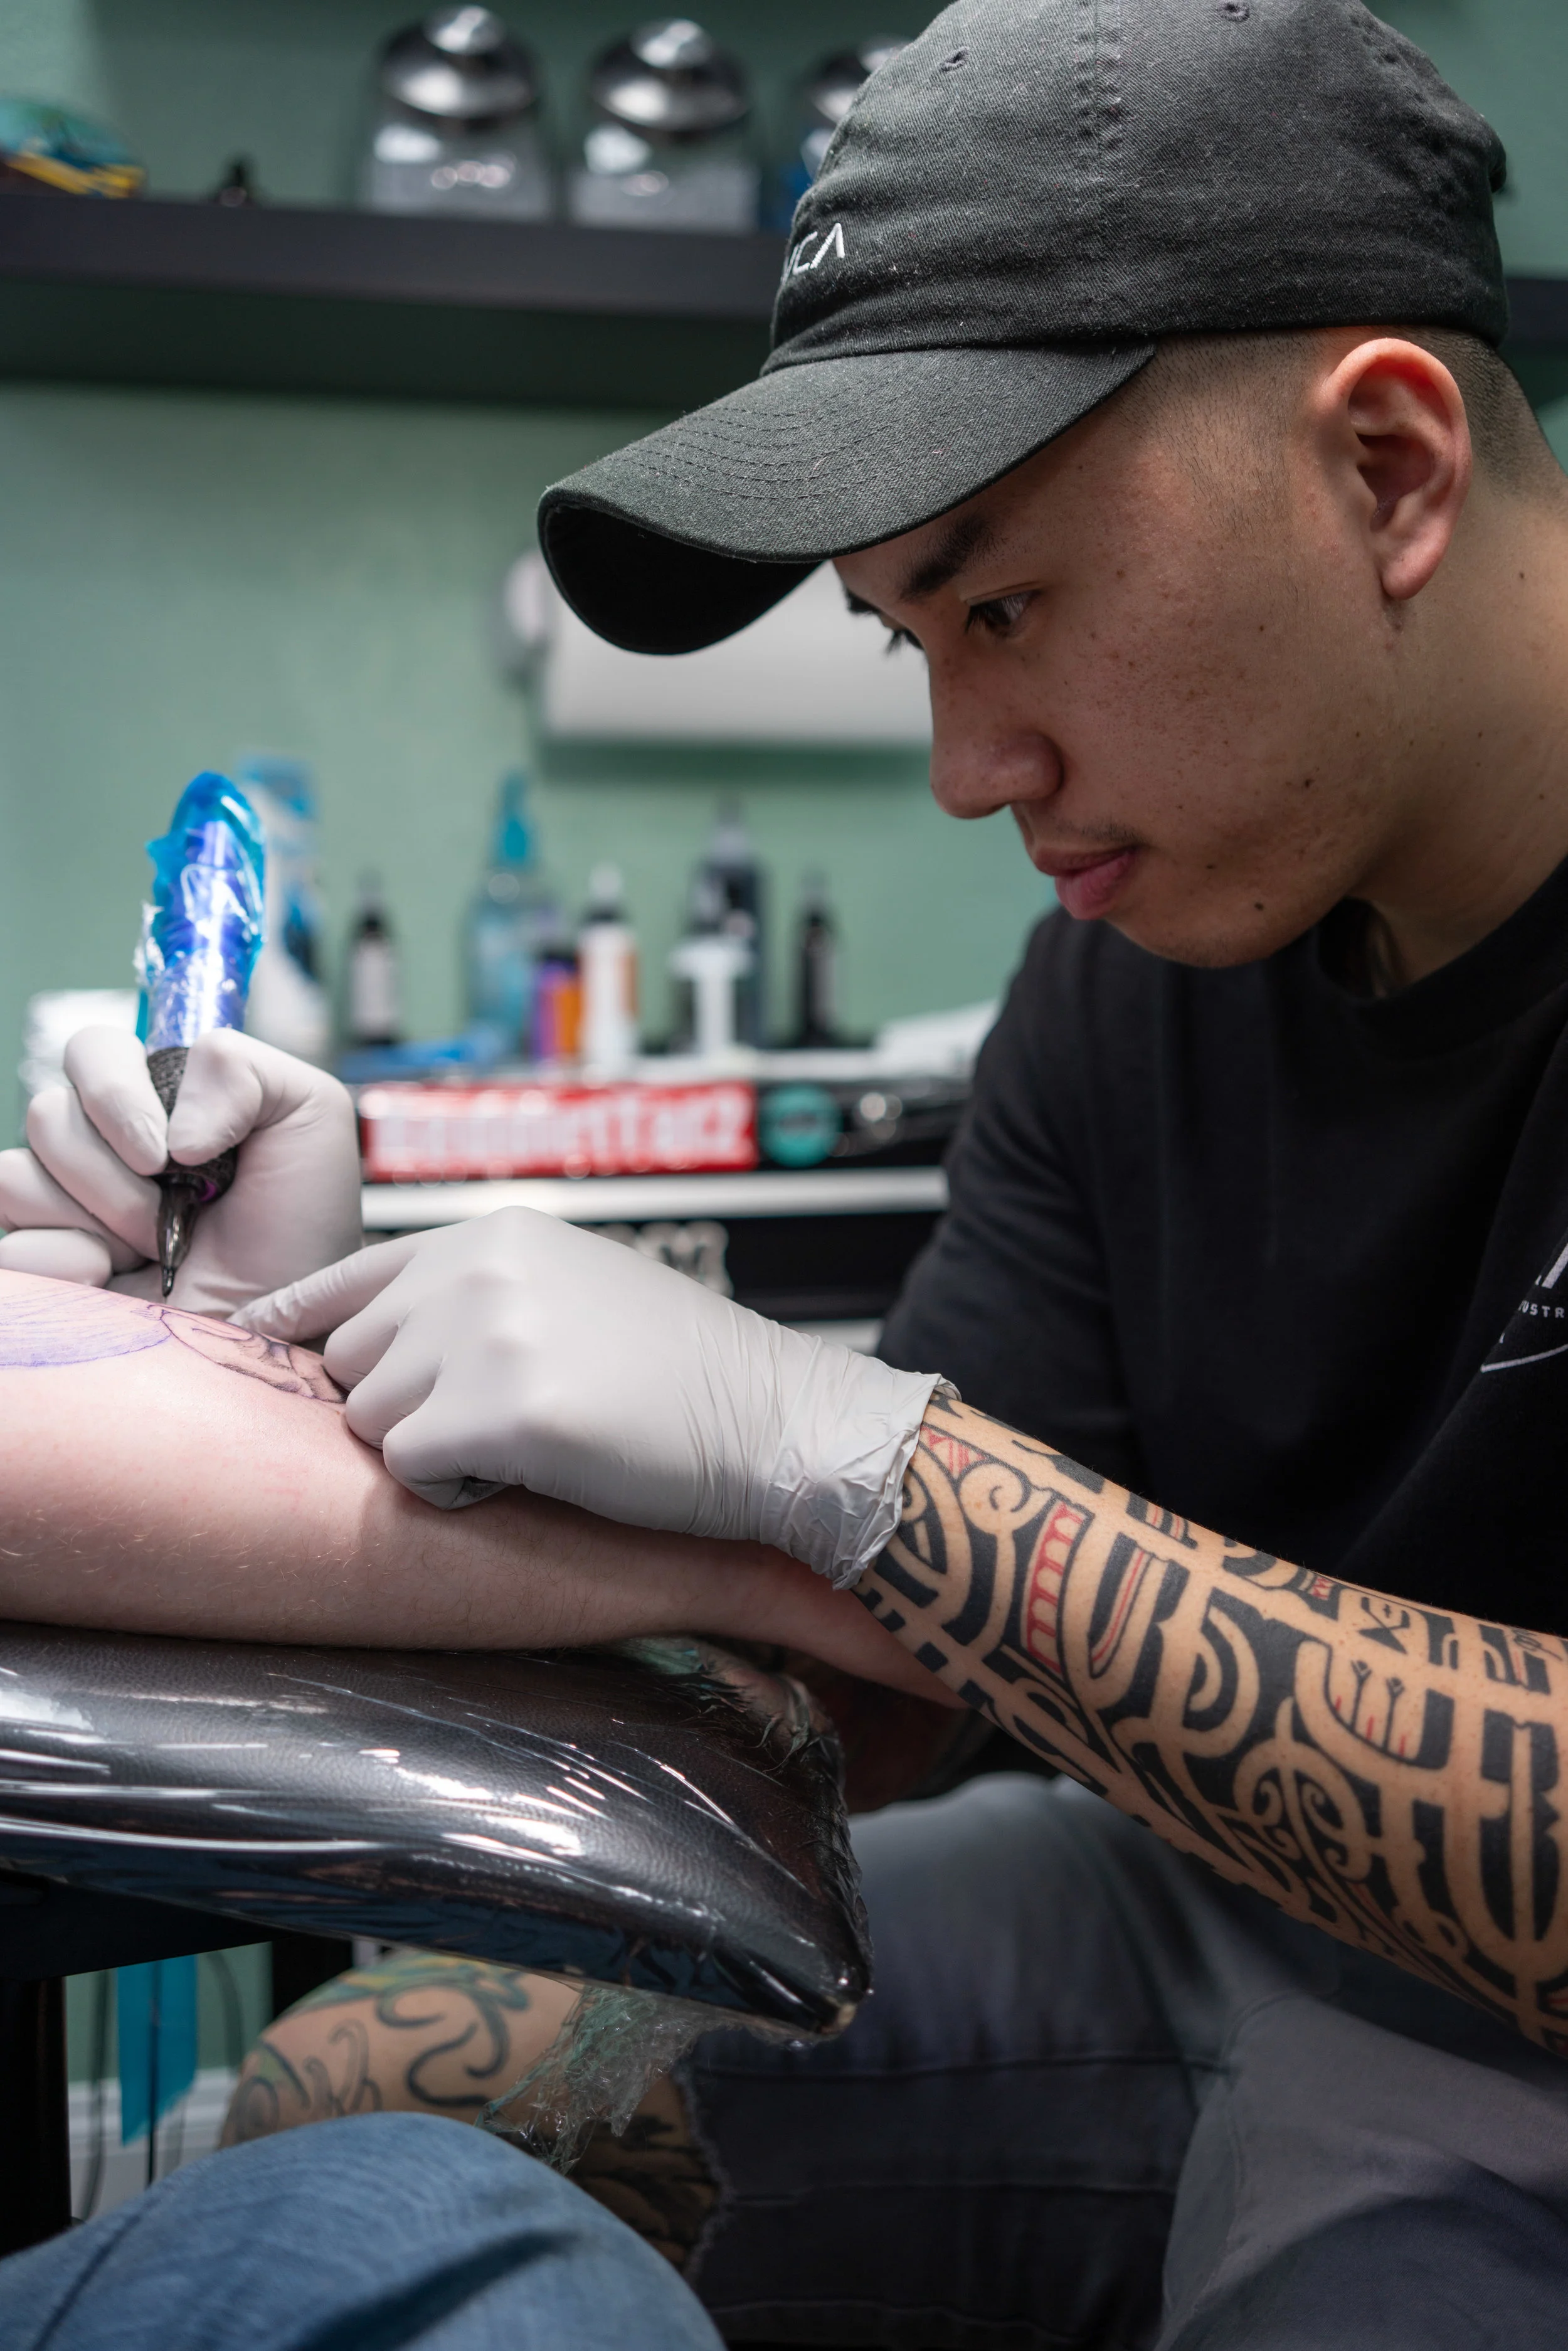
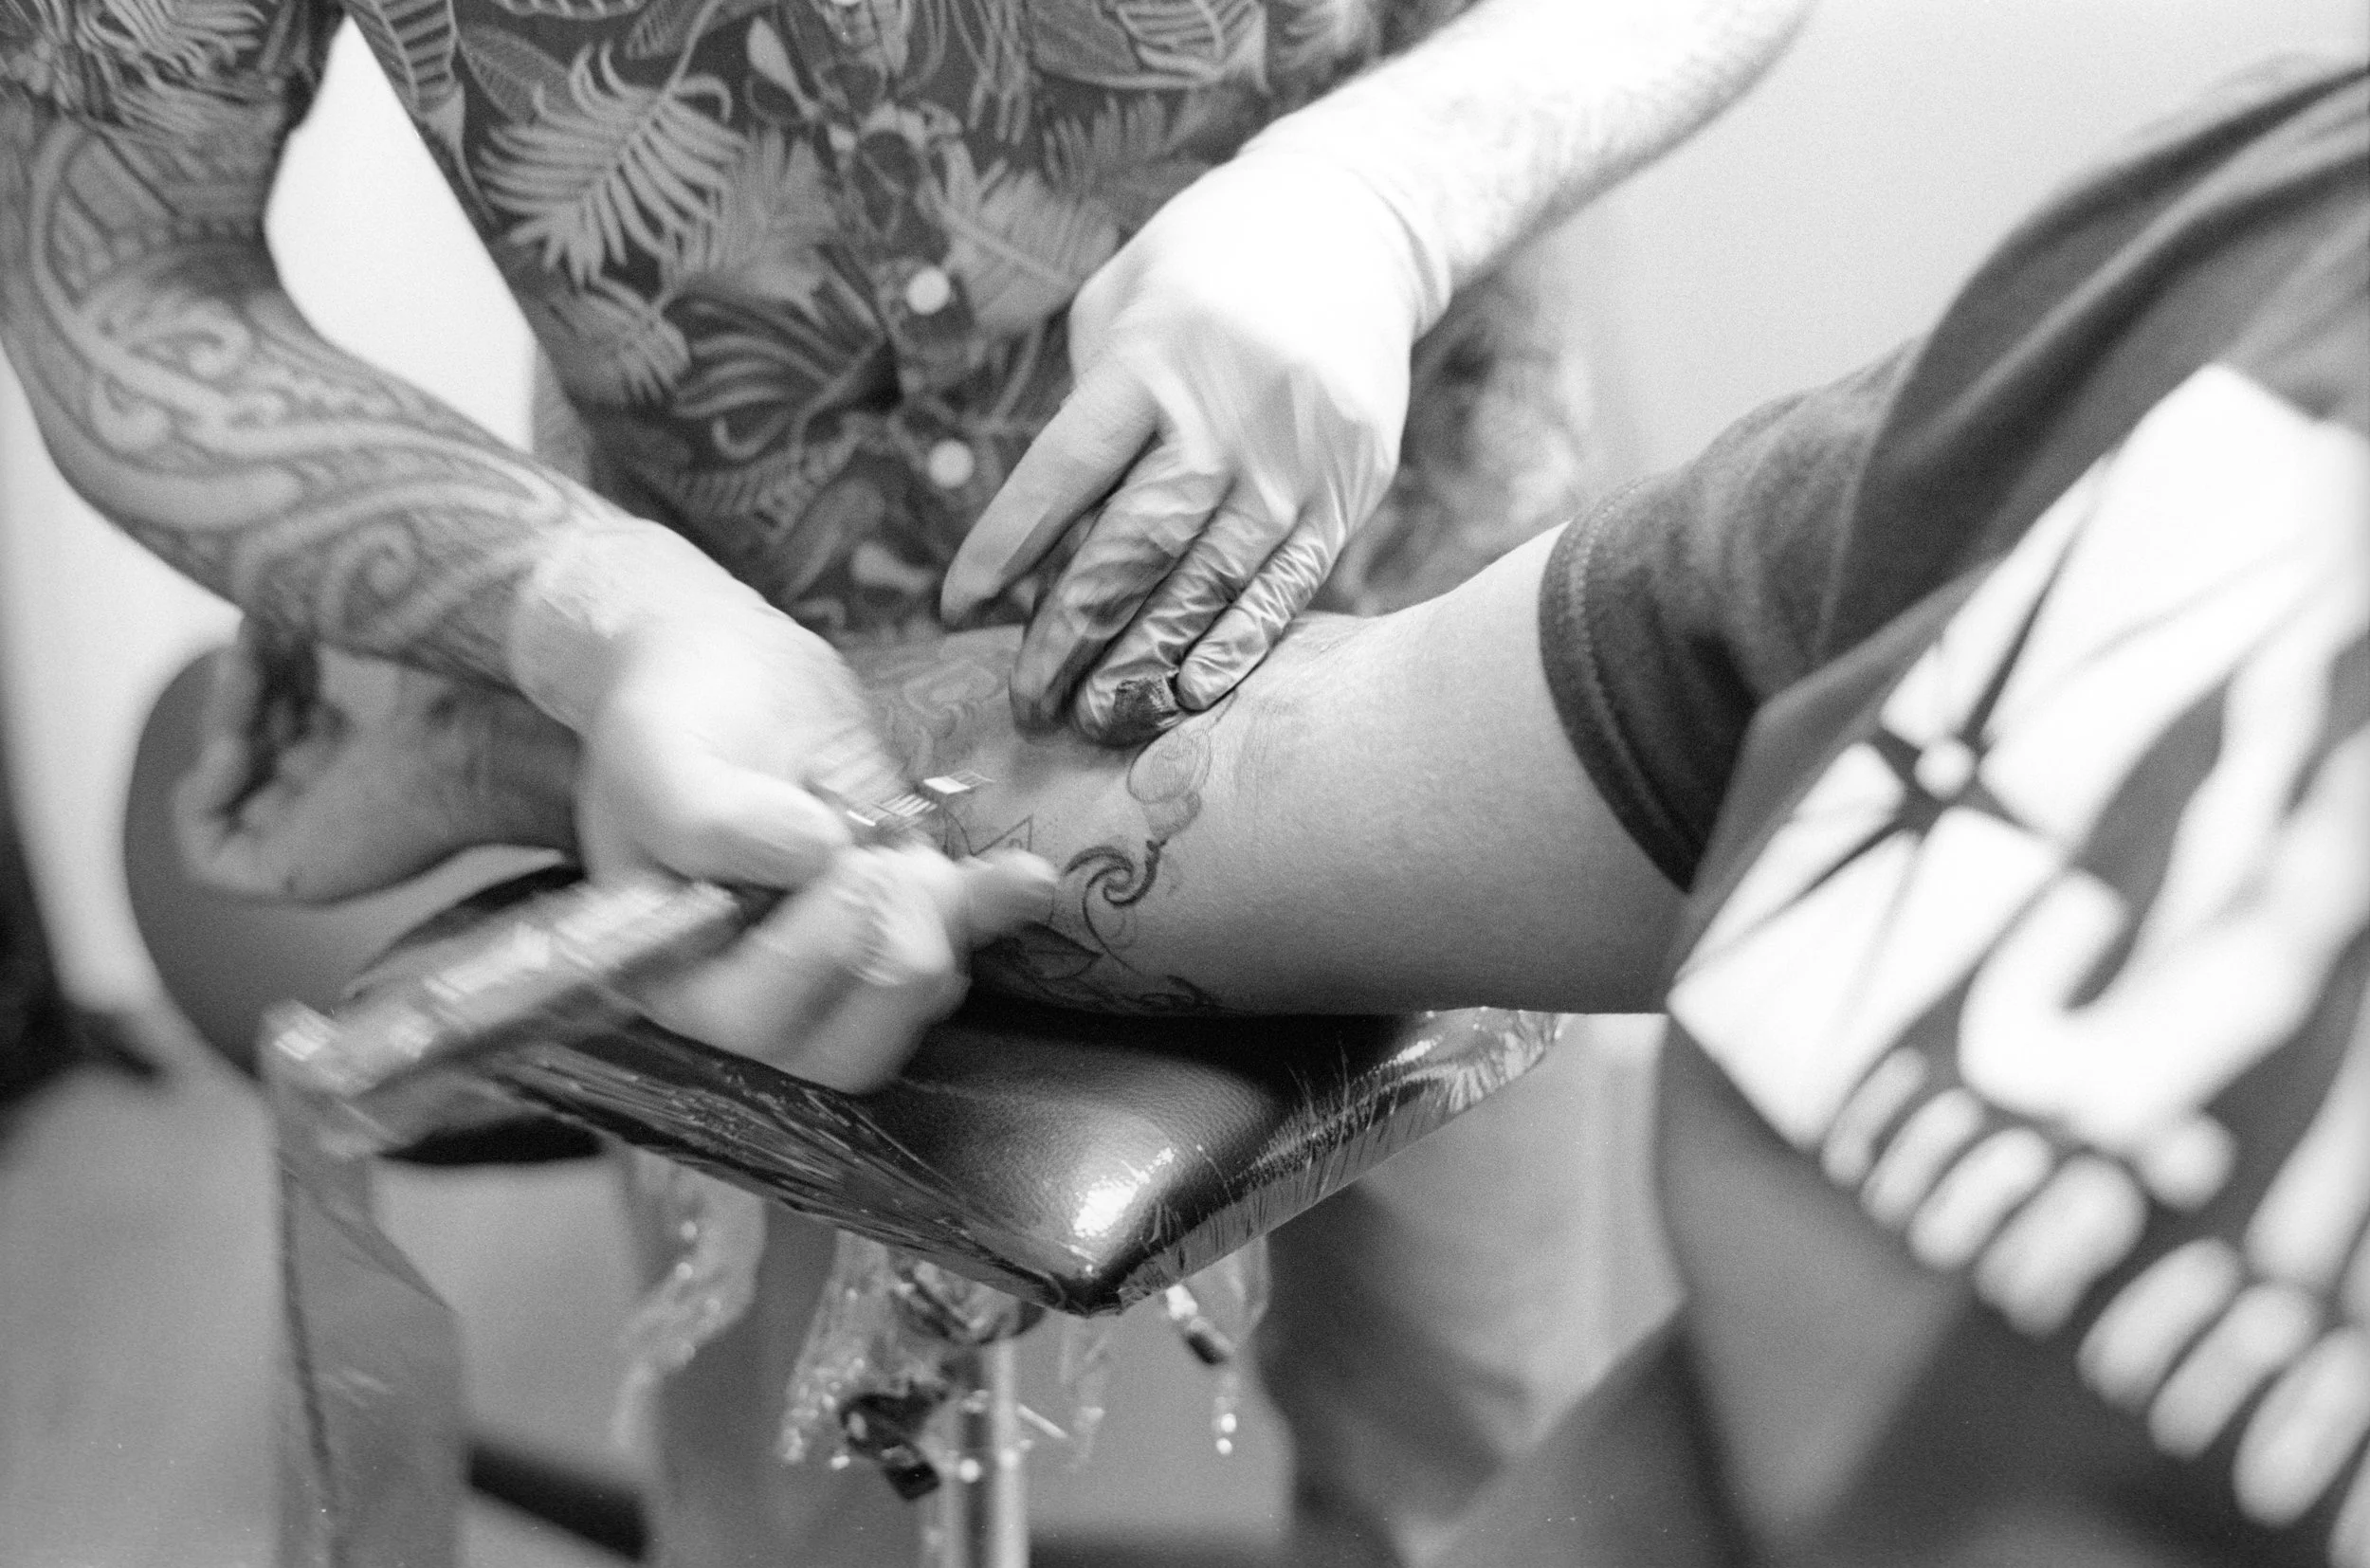
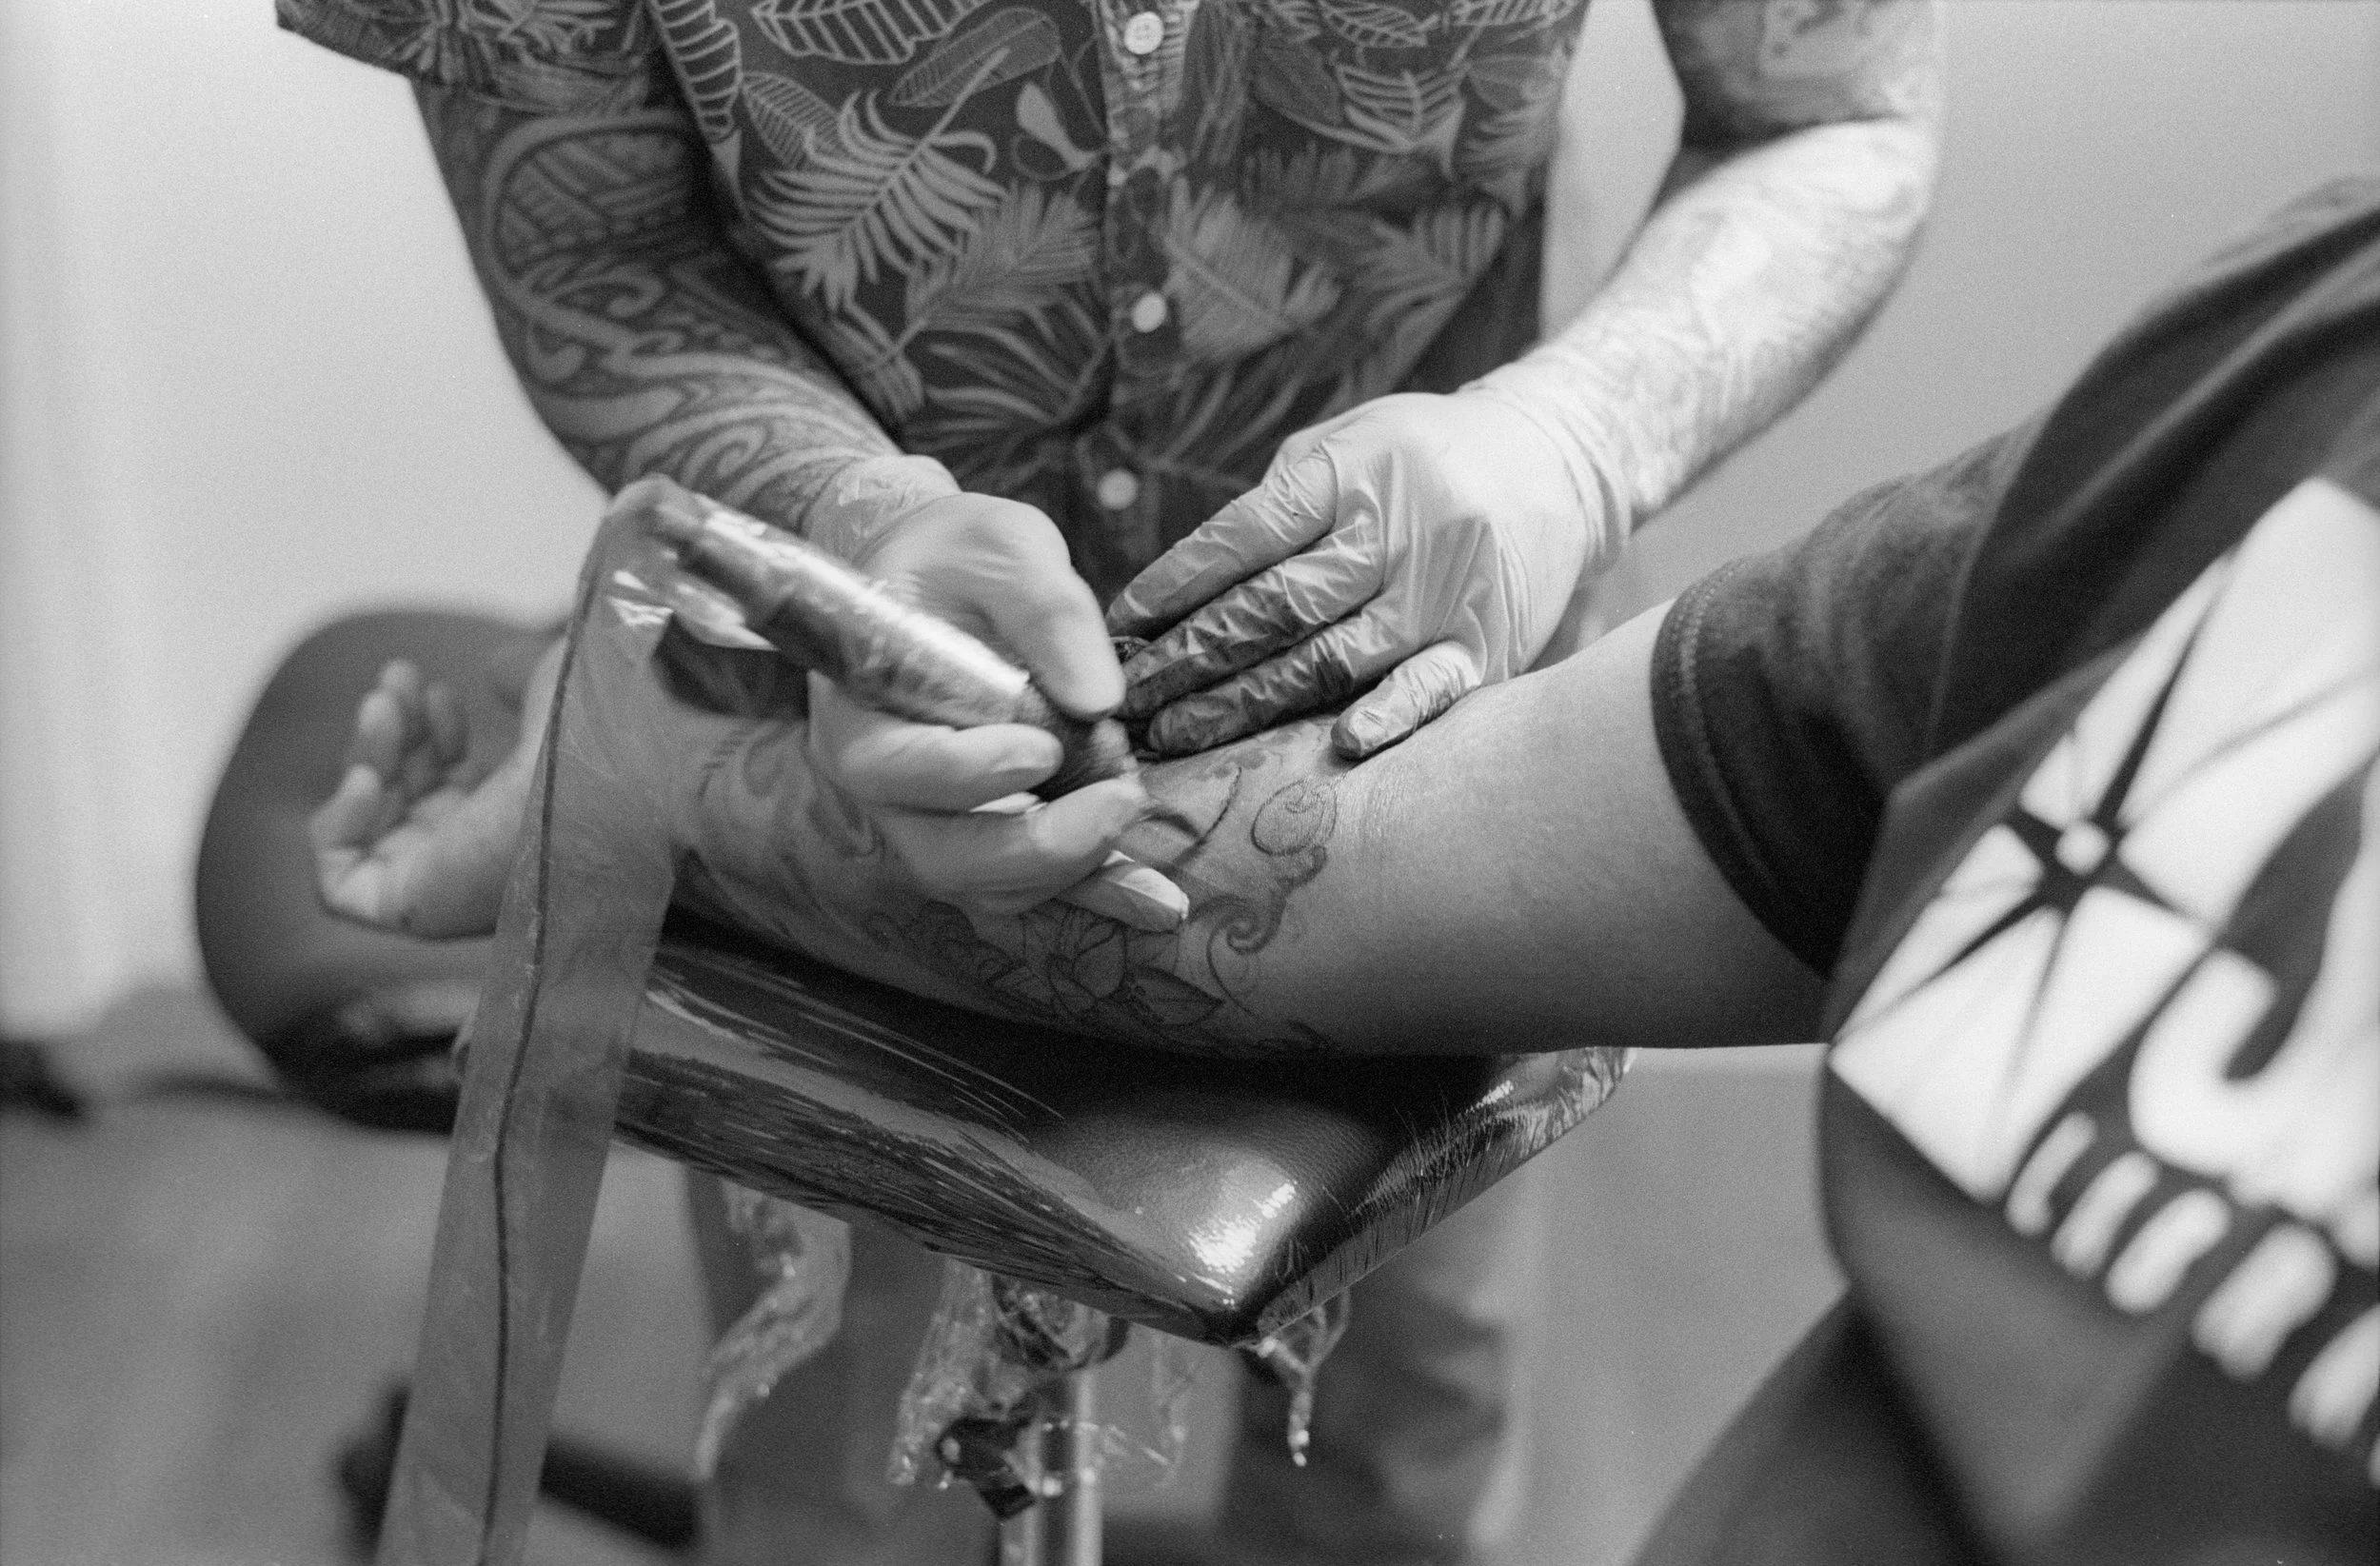
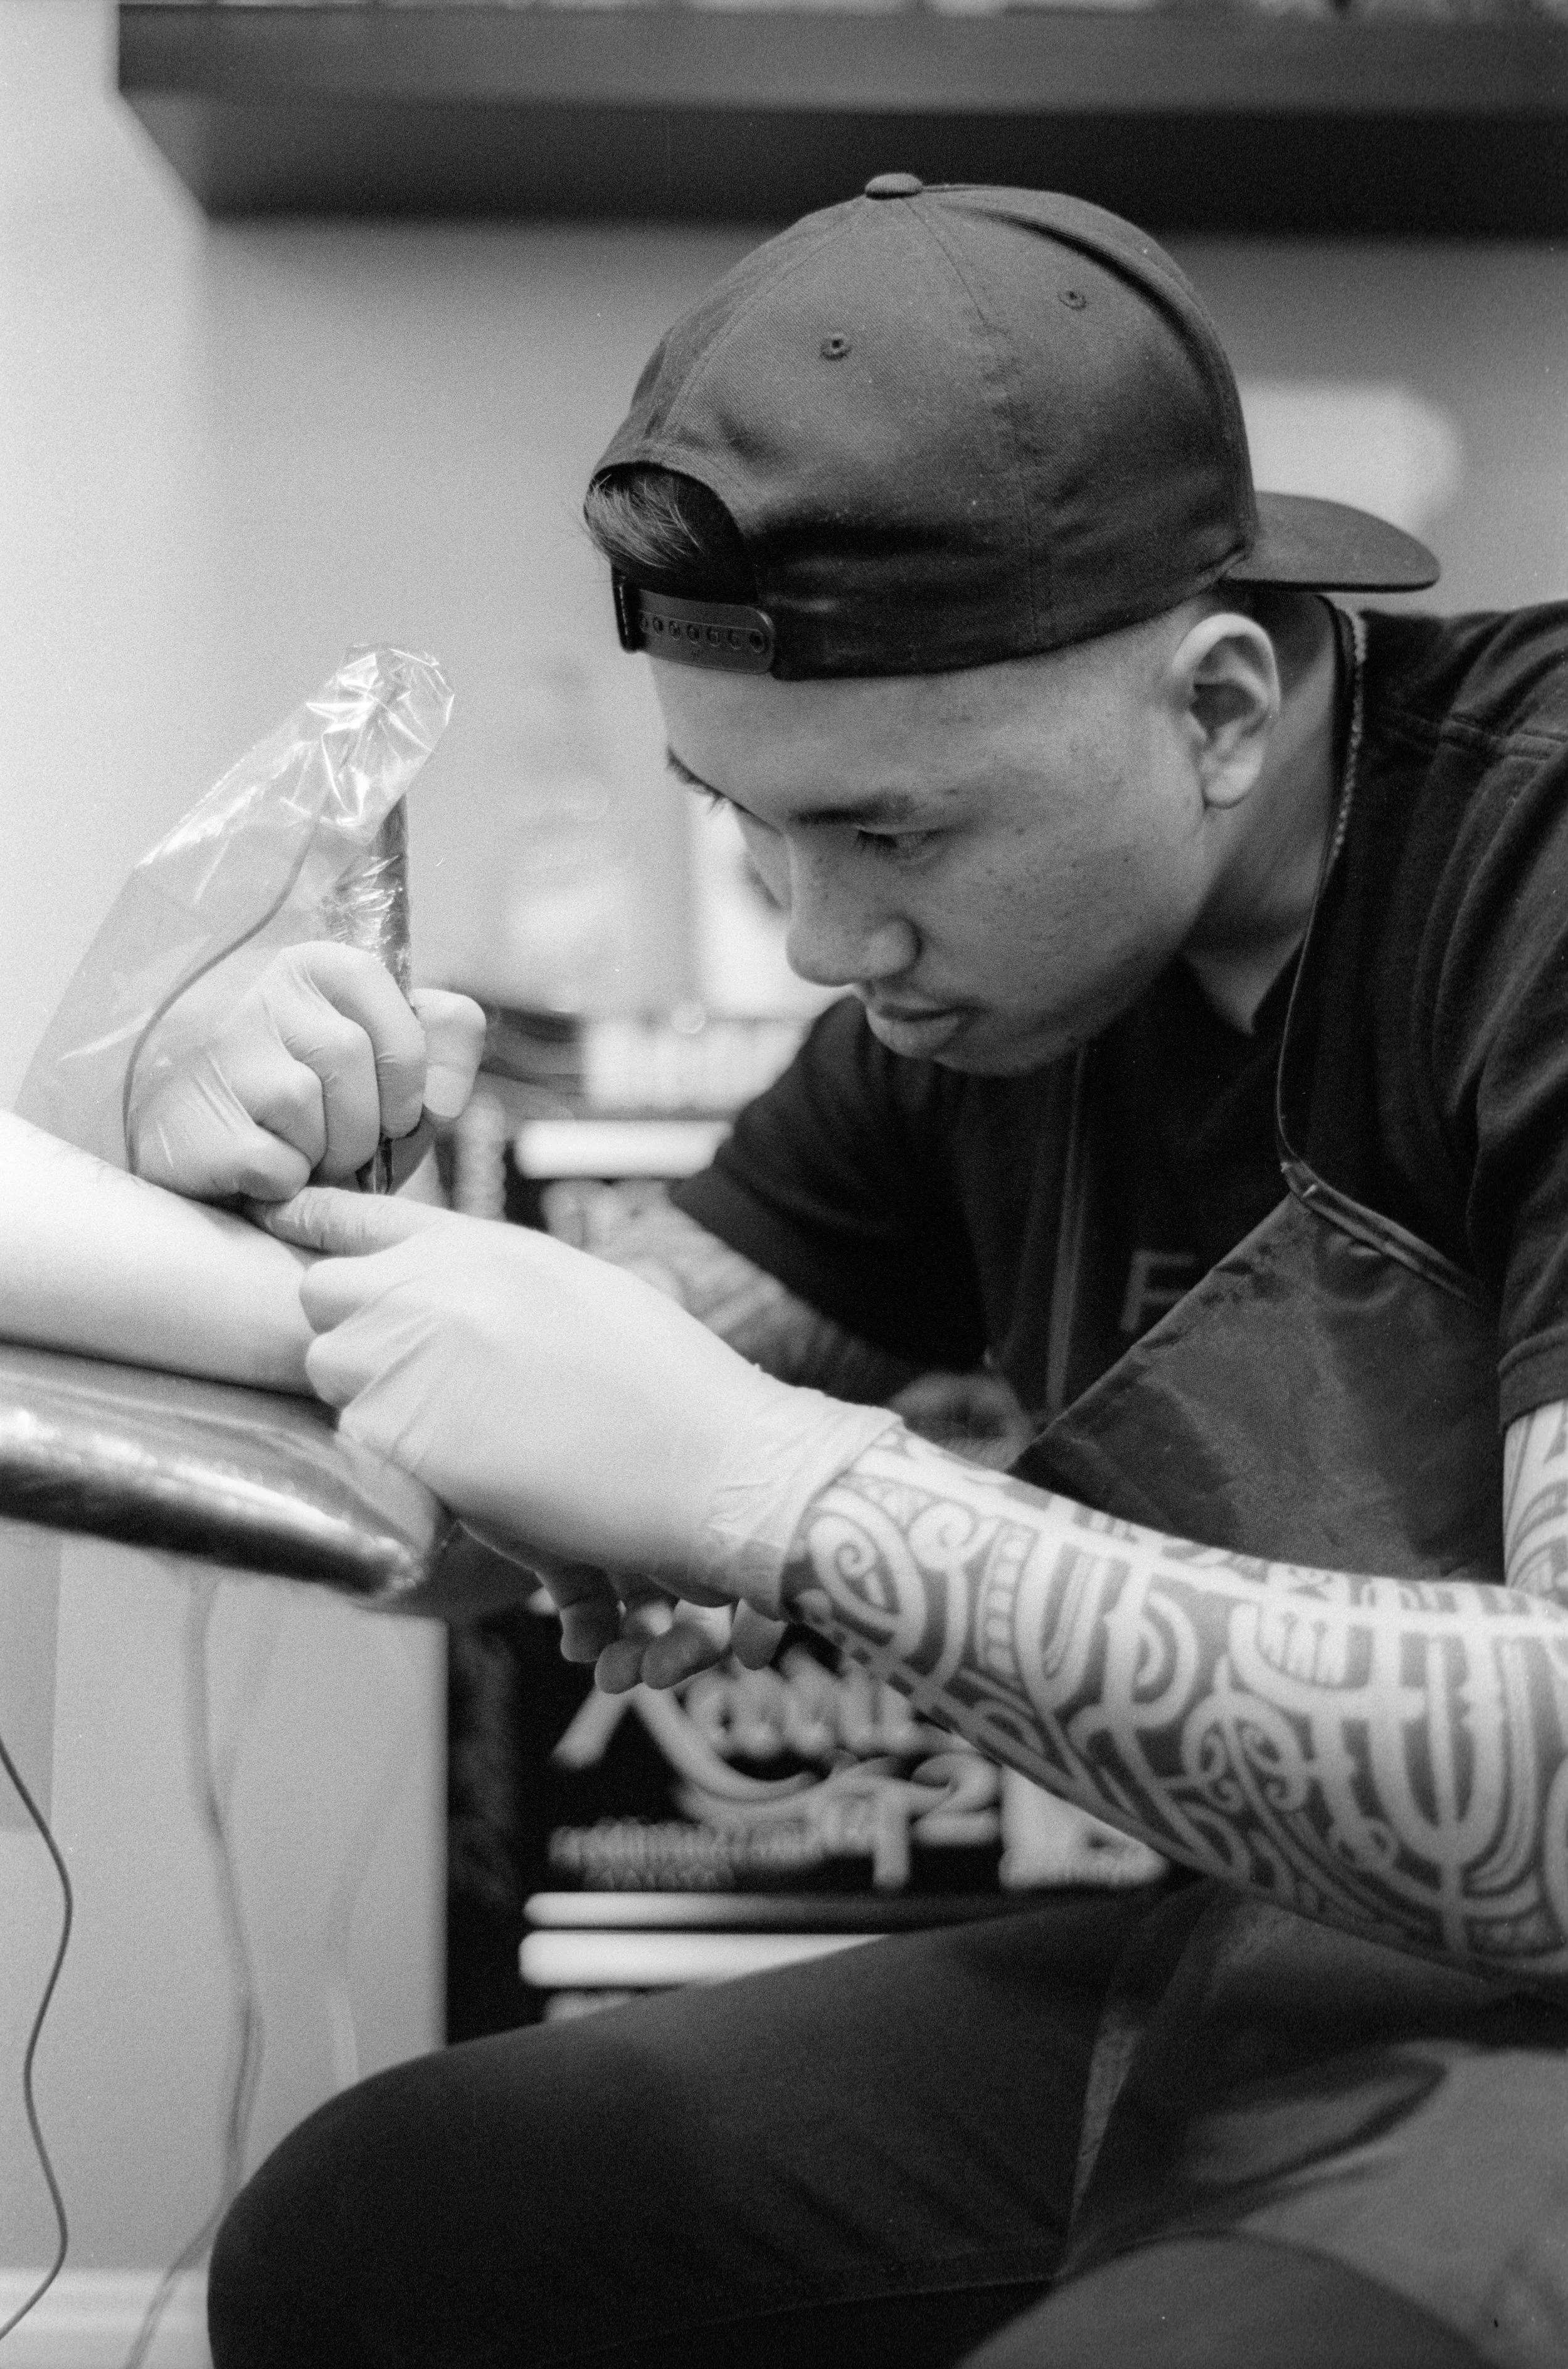
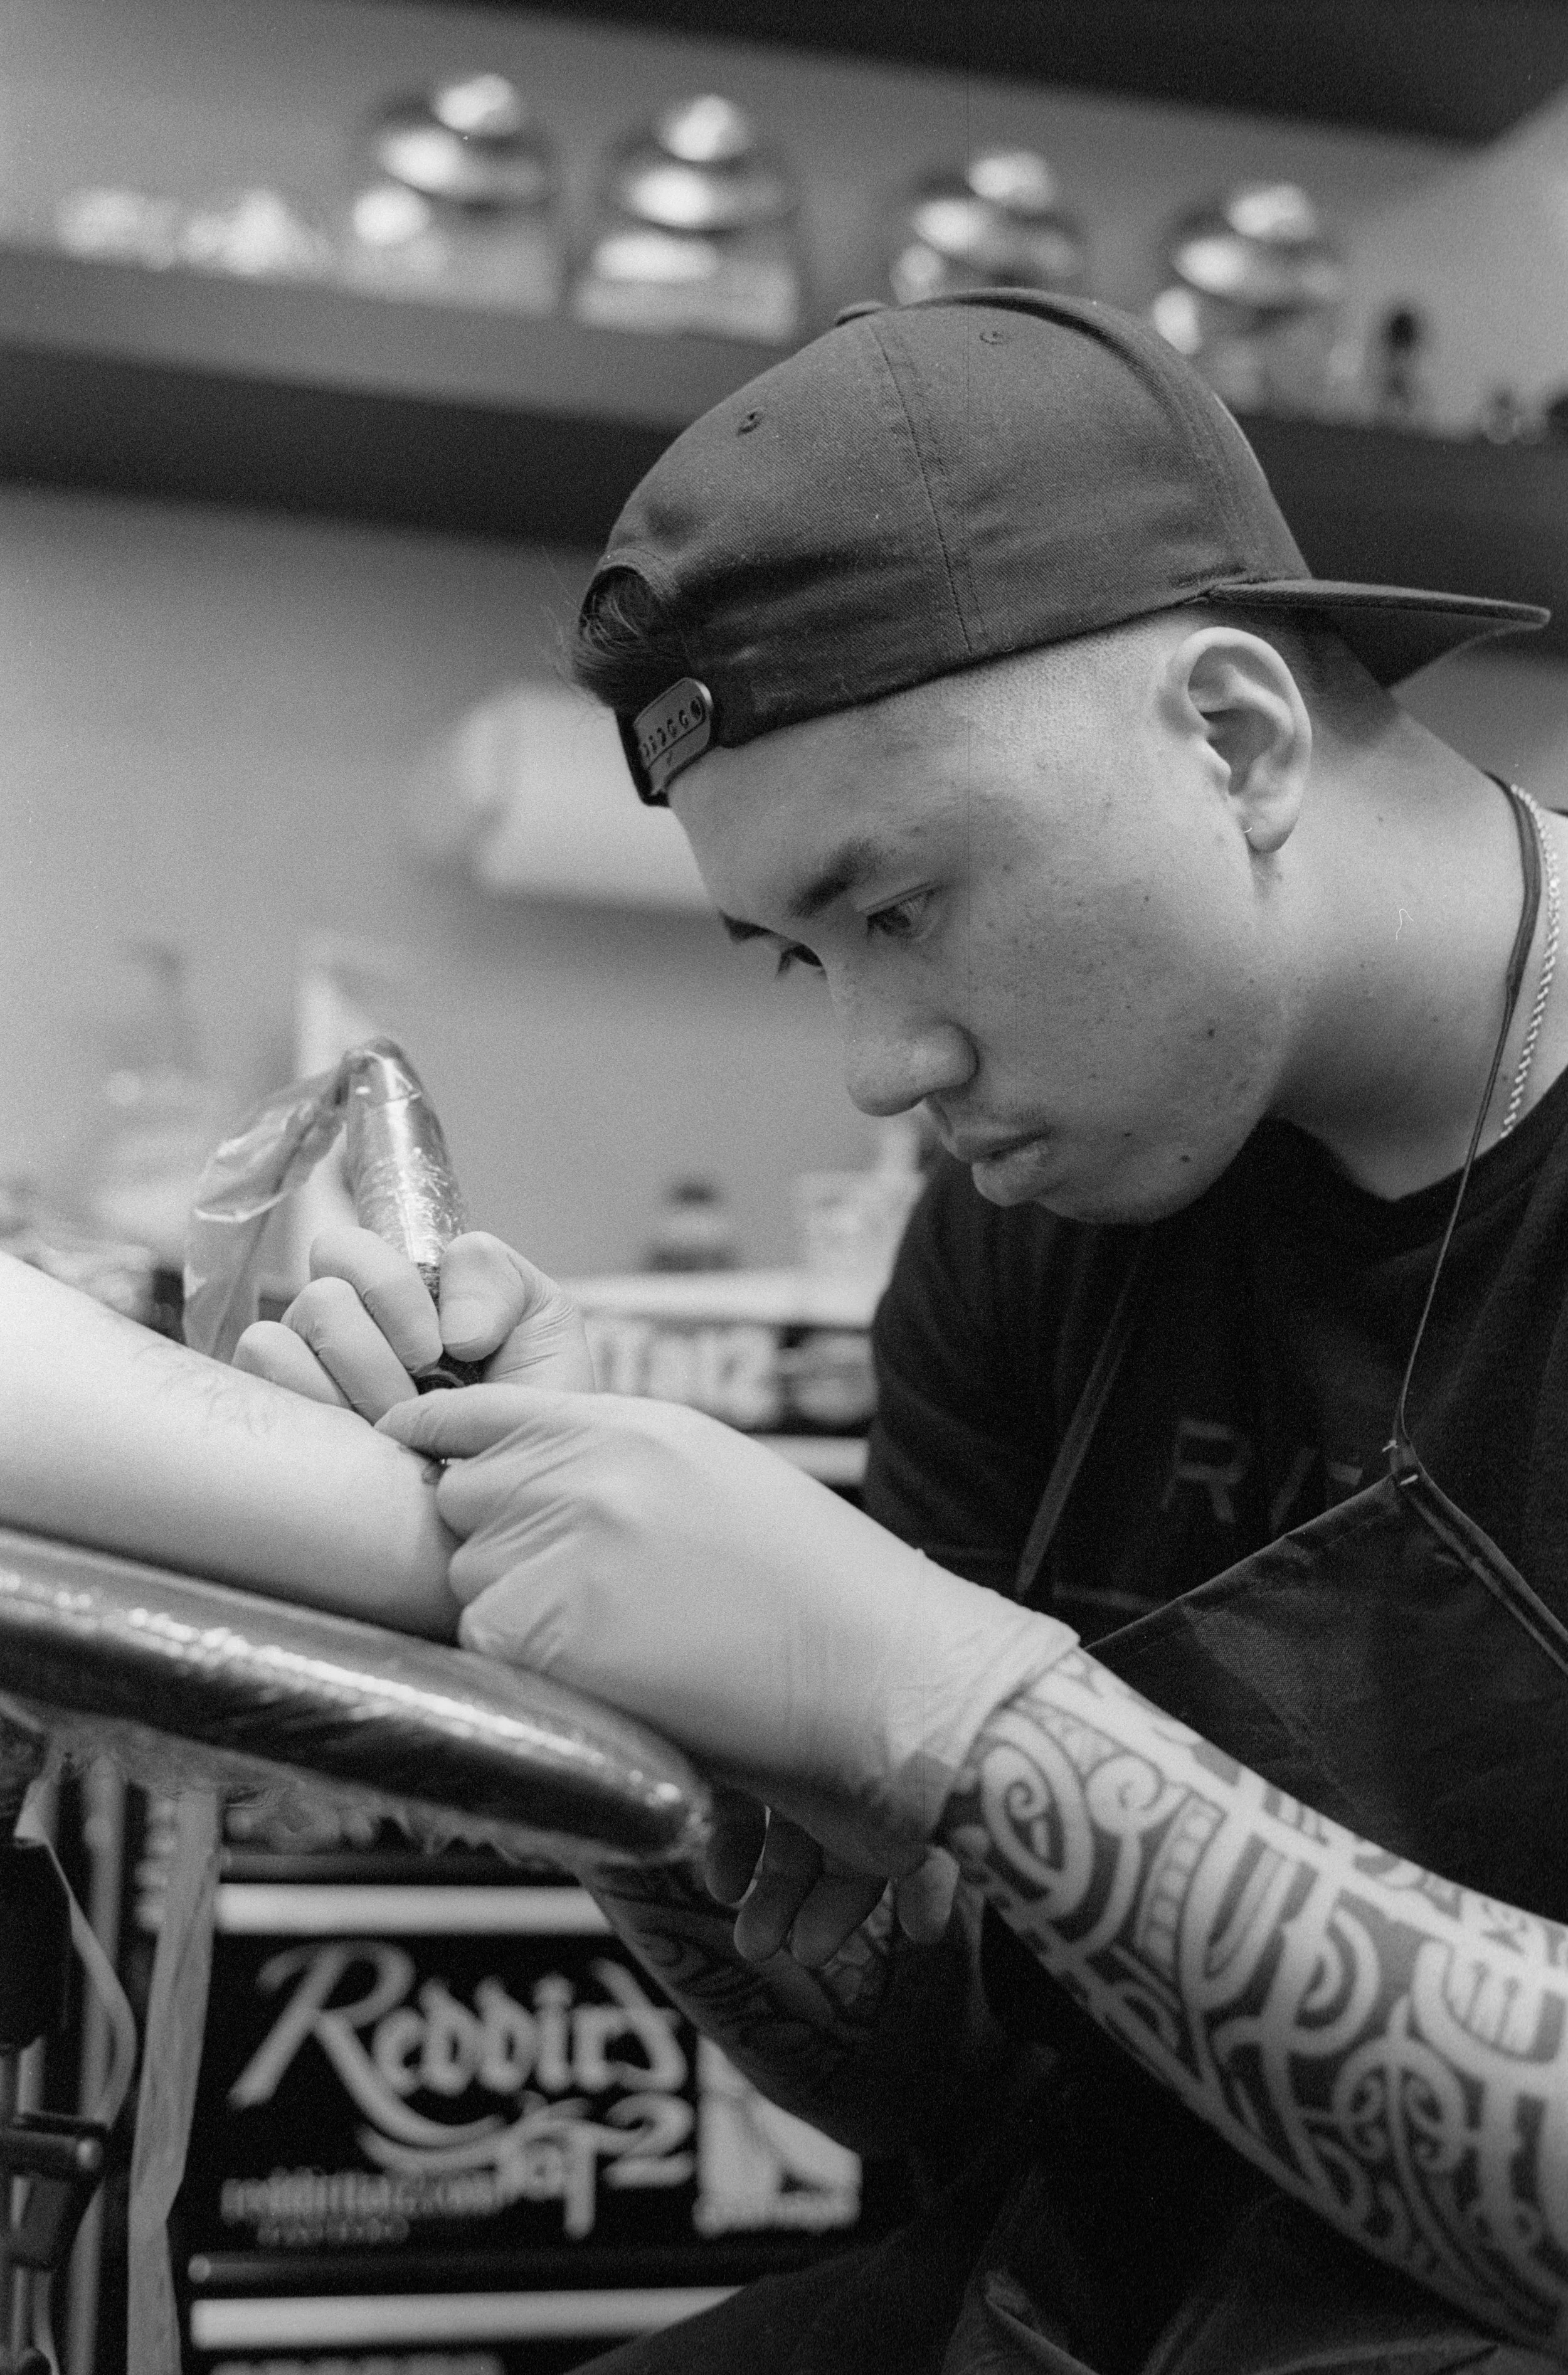
In testing this lens, I took it to The Needle Lounge, a tattoo shop in Lakewood, WA to take some environmental portraitures of the artists at work. I wanted to specifically mention this shoot because one thing that I noticed during this shoot was this lens’ issue with eye autofocus and the fact that it was nonexistent. I could not get eye AF to work with this lens and my Sony A7RIII. Face detection worked but Eye AF just did not activate no matter how the subject was situated, facing straight towards the camera or slightly turned. Because of this, I spent the majority of the shoot manually focusing on the eyes and that gave me good results. When I got home, I did some quick internet searches and found that this lens could indeed use Eye AF. So, I went back to The Needle Lounge to specifically test for the Eye AF functionality. The second time around, Eye AF detected the eye without a problem, even when the head was turned at an extreme angle. So at this point, I don’t know what to say about Eye AF. Is it available? Yes, but from experience, I do have my reservations about it.
Samyang 35mm f/2.8 AF Eye Autofocus
Something that I do want to bring up with the autofocus of this lens is the noise that it makes because that can be audible in specific situations. The first time that I mounted this lens, I had my A7RIII in AF-S, so the camera only attempts to acquire focus on a single subject per AF activation. When I did this, I noticed a noise coming from the lens. Turning the camera around and looking at the lens when activating autofocus shows that this lens opens the aperture wide open when autofocusing and closes back it down when focus is acquire. This opening and closing of the aperture is where the noise that I noticed was coming from. This is only something that you notice when you have the aperture at anything other than wide open because if you’re at f/2.8, the lens won’t have to open the aperture because it’s as open as possible with this lens.
Another situation where I’ve noticed the AF noise is when the camera is using AF-C or continuous autofocus in video. If you’re using these setting, you can hear the autofocus motor in the lens continuously moving. I personally don’t think that this is a problem because I can’t hear the noise when the camera is more than a foot away, even in a really quiet room. You really have to be right on the lens to hear it but if for some reason you have a mic directly on the lens, the mic may pick up the noises up.
4K Video Sample with the Samyang 35mm f/2.8 AF
Finally, let’s look at some image samples taken from this lens. Again, I’m not much of a pixel peeper but I will say that I did notice the sharpness of this lens. For something so cheap, I’m quite surprised at how well this lens performs in terms of sharpness. I can easily make out the details on the artist and fine details like the individual lines of a tattoo.
The bokeh from this lens is also quite nice. For a 35mm f/2.8 lens, you can get some pretty decent background blur, but this is not in comparison to any other lens. We are only looking at this lens independently and I personally believe that the bokeh is quite nice considering the specs of this lens.
At the end of the day, this a cheap lens that regularly sells for $250. With that in mind, I think that this lens provides such great value and performs above and beyond everything that I expected. Not only does it provide me with the small and compact lens that I wanted, but it does it with surprisingly good results.
If you’re interested in this lens, then I’m sure that you know about it’s Sony counterpart, the Sony Sonnar T* FE 35mm f/2.8 ZA Lens. This is the original E mount compact lens from which we can probably assume Samyang got its inspiration from. I’ve seen some reviews comparing the Samyang vs. Sony lens and although most comparisons will say that the Sony has a slight optical and build advantage, you have to ask yourself if it is worth paying more than 3 times the price? For me, it is not. I originally wanted the Samyang as a backup to my Sony 24-70mm GM. I don’t expect to be using this type of lens that often, so there is really no point in investing in the Sony 35mm. I’m perfectly happy with what the Samyang provides me, especially for the price.
If you’re interested in a small, lightweight and compact lens that autofocuses for the Sony E mount system, then I can’t recommend the Samyang 35mm f/2.8 AF enough. Pick one up and try it out for yourself. I think that you’ll be surprised at what this little lens can do.
Want to support my work?
Consider visiting the shop and buying "Absolutely Nothing" https://www.HaiHoangTran.com/shop/absolutely-nothing
or
Become a Patron!
https://www.patreon.com/HaiHoangTran