Barton Alligator Grain Leather Quick Release Watch Straps

I’ve been in the market for some new leather watch straps. Being that I’m a slave to the Amazon overlords, I did a quick search and discovered the brand Barton which manufacturers many different watch straps. One line of straps that really stood out to me was the Alligator Grain Leather quick release straps. So, I reached out and Zach over at Barton was kind enough to send over the entire current line up for review.

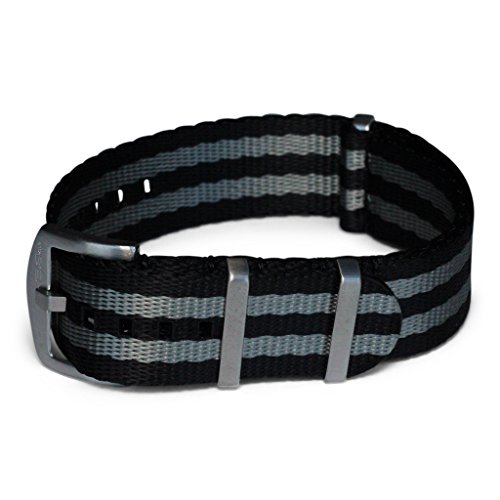
Here they are, the Barton Alligator Grain Leather quick release straps. These straps currently come in 6 different colors: black, coffee brown, toffee brown, navy blue, smoke grey and crimson red. They are currently available in 3 sizes: 18mm, 20mm and 22mm. To further add to the customization, you can also choose the buckle hardware color. With this, there are 5 options: stainless steel, black PVD, gunmetal grey, rose gold and gold. I decided to get stainless steel on all the straps that I received because that is the best option for the watches that I own.

All of the straps are crafted from top grain leather and embossed with an alligator texture. Holding the top and bottom layer together are matching colored stitching. The hardware of these straps are made from 316L stainless steel and are mirrored polished. The straps are approximately 8 inches in length and should fit wrists from 5 1/2” to 8” in circumference. No matter the lug width size that you buy, all straps will feature a 2mm taper from the lug end to buckle end. The straps are also thicker at the spring bar than at the buckle and that’s because these are padded watch straps. Sandwiched between the top and bottom leather is an additional piece of material. This helps to add to the comfort of the strap but comes at the expense of bulk. In this case, the straps are 5mm thick at the spring bar and 3mm thick at the buckle. This is a noticeable difference in hand but on the wrist, little difference can be felt and I don’t mind the bulk for the increased comfort.

One thing that I haven’t mentioned and is my main attraction to these straps is the quick release spring bars. These function the same as the typical spring bars but on the side of the spring bar, is a quick release lever. This allows you to remove and install these straps without the use of any tool. Just use your nail to pull on the lever and the end will retract into the spring bar body. This is such a simple design but very effective and I wish that all watch straps featured something similar.

In the short time that I’ve had these straps, they’ve quickly become some of my favorites. When I want to wear a leather strap, these are often the first choice. The straps mold to my wrist very quickly and are extremely comfortable. At under $30, I think that these Barton Watch Bands Alligator Grain Quick Release Watch Straps are hard to beat. If you’re in the market for something similar, I think they are worth a try.

Although these straps were sent to me for review, the opinions that I’ve stated are my own. I was not obligated to say anything about the product.


If you're considering on buying any of the products mentioned, please support my work by using the links below.

Barton Alligator Grain - Quick Release Leather Watch Bands https://amzn.to/2X4COX8


Want to support my work?

Consider visiting the shop and buying "Absolutely Nothing"

https://www.TheUpperLeftUSA.com/shop/absolutely-nothing

or

Become a Patron!

https://www.patreon.com/HaiHoangTran

Minimizing my Camera gear for Travel

Nothing is finalized yet, but it’s looking like I’ll be spending a good portion on my summer traveling abroad. This may be my most complicated trip in terms of logistics and when traveling, the thing that complicates my trips the most has to be my camera gear. I’m the type of person that likes to pack everything to make sure that I forget nothing. This just means that I bring a lot of stuff. This makes traveling complicated because before I even get to my destination, I have to worry about whether or not the gear will even successfully make it on the plane and inside the cabin. If you’ve haven’t seen it, in my Traveling by Plane with Camera Gear video, I talked about how camera gear and anything that you find valuable should be taken into the cabin as a carryon because unless you’re traveling with something like a Pelican case, there is a huge chance of the gear getting damaged. From my experience, the best way to get this done is to just travel with a bag that will blatantly fall within carryon size requirements and to travel light because many international airlines have a strict carryon weight requirement. Downsizing my gear of course also has the benefit of making my entire experience more enjoyable because I don’t have as much to carry around. With all of that in mind, I’m going to walk you through what I think will be the best minimal setup for me.

First let’s talk about the bag because that’s possibly the most important factor to all of this. The bag that I’ve decided on is the Jill-E Designs JACK Hemingway 15" Leather Backpack. This is a new bag for me but I saw the potential because it seems to be pretty well setup for travel even though it’s fairly simple and minimal. On the outside is one external pocket. This is pretty decently sized and I think it’ll be good for holding things like filters, batteries and small accessories like that. On the side of the bag is a zipper which leads to a stretch panel made for a water bottle but I’ll probably make this work with my travel tripod. Moving inside, the bag has a bunch of organization pockets for pens, electronic devices and the like. I chose this backpack because like I said earlier, it is blatantly smaller than any carryon size requirement. I’m certain that this bag will actually work as a personal item, which is another type of baggage that you’re typically allowed in the cabin. Again, watch that Traveling by Plane with Camera Gear video to learn more about this. So, if I’m able to efficiently use this bag, I’ll actually still be allotted a carryon luggage. This means that I’ll just be able to carry on my essentials in the carryon and maybe not need anything else besides the two bags.

My current plan is to use the Jill-E bag as my camera bag and I’ll be able to accomplish this with the various camera inserts that are available for this bag. I actually own two different inserts, the
Jill-E Designs Jack Backpack Insert and the Jill-E Designs E-Go Camera Insert. Right now, it’s looking like I’ll be bringing both of these along for my trip. The larger Backpack Insert will be used when I’m just traveling and have everything put away. The E-Go Camera Insert will be for short day trip use where I’m just carrying one body and one lens. The E-Go Camera Insert actually comes with its own carrying strap that turns the insert into an independent bag so if I really want to go minimal, this is an option. Again, if I’m able to carry all my camera gear in this bag, it’s going to make my life a lot easier when traveling and frees up my carryon.

Now, let’s talk about the camera gear that I’ll be bringing. After some thought, I think that I’ll only be bringing one main camera setup and that’ll be the Sony A7RIII and the Sony 24-70mm f/2.8 GM. This is the setup that I most use on a day to day basis and the setup that I’m most used to. With this, I’m pretty much able to get anything done. I’ve actually traveled with a similar setup in the past and it was nice but definitely limiting. I shoot photos and videos and having only one camera really makes this difficult because I can only shoot photos or videos, not both at the same time. Sometimes, I like to get footage of myself doing photography. This is obviously not possible with only one camera. The only answer is to bring another camera, one for photos and one for videos. So, if I do bring another camera it will be the Sony A7RII and attached to that will be the Sony Vario-Tessar T* FE 16-35mm f/4 ZA OSS Lens. Finally, the tripod. A lot of my work involves the use of a tripod so it’s just something that I’ll have to bring. The one that I’ve decided to bring is the Benro FIF19CIB0. This is my current favorite travel tripod. It’s small, lightweight and extremely capable.

Like I said, the trip is not finalized yet. I don’t know when I’ll be leaving, where I’m going or which airline I’ll be flying with. That last factor is a major determiner for all of this. Different airlines have different regulations for luggages. The airline that I fly with will play a role in the gear that I bring.

All that being said, this is looking to be a travel heavy summer. There’s going to be a lot of new travel/photography content coming soon so make sure to check back for that!


If you're considering on buying any of the products mentioned, please support my work by using the links below.

Jill-E Designs JACK Hemingway 15" Leather Backpack https://amzn.to/2KlAoNQ

Jill-E Designs Jack Backpack Insert https://amzn.to/31DV3lk

Jill-E Designs E-Go Camera Insert https://amzn.to/2RiCte0

Sony A7RIII https://amzn.to/31ABpXE

Sony 24-70mm f/2.8 GM https://amzn.to/2IjKXPa

Sony A7RII https://amzn.to/2O35rwl

Sony Vario-Tessar T* FE 16-35mm f/4 ZA OSS Lens https://amzn.to/2JED5VG

Benro FIF19CIB0 https://amzn.to/2Idiw6x


Want to support my work?

Consider visiting the shop and buying "Absolutely Nothing"

https://www.TheUpperLeftUSA.com/shop/absolutely-nothing

or

Become a Patron!

https://www.patreon.com/HaiHoangTran

Under $100 Dress Watch | Citizen Corso AO9000-06B

I have for you a watch that I’ve only recently picked up but have been keeping an eye on for some time, this is the Citizen Corso AO9000-06B.

I first saw this watch a few months back but decided not to pull the trigger on it because I wasn’t in the market for such a watch. But, this piece recently went on sale for $81.99 and at the price, I just had to pick it up. That being said, the price of this watch is constantly changing. If you’re interested in this timepiece, check this link to get the most up to date pricing.

Upon first impressions, this is a very typical and straightforward watch. This piece features a 42mm stainless steel case and a silver tone dial. To contrast the dial are black Arabic numerals and blue hands. Siting at the 3 and 9 o’clock positions are two sub-dials which indicated the day and date. This particular watch comes on a black alligator print leather strap but if this color-way doesn’t suit you, there is a rose gold version with a black dial and brown leather strap.

ASSASSIN_S005_S001_T019.jpg

This watch features the Citizen 8635 movement. I’m not going to lie, I have no frame of reference for this movement. This is actually the first Citizen watch that I’ve ever purchased. That being said, Citizen is an absolute powerhouse and is known for making quality quartz movements, even in a low end watch like this. I have no doubts that this watch will last for years to come.

One thing that I do appreciate about this particular movement is the inclusion of Citizen’s Eco-Drive. To keep it simple, this is essentially Citizen’s proprietary light-powered watch technology. This just means that the watch is able to generate power by converting light into energy, whether it’s natural or artificial. Citizen’s Eco-Drive advertising is “A watch that never needs a battery.” That is not completely true because there is a battery in this thing and the battery will eventually die even with the Eco-Drive but we are talking years and years.

ASSASSIN_S005_S001_T022.jpg

With this watch, there are a few things that can possibly be considered as negatives. First, Citizen only advertises that this watch is “Splash Resistant”. They don’t even both to put a meter rating. This likely means that you should not get this watch near water. Sure, the occasional splash from washing your hands will be fine, but this should not be something that you swim with. I don’t consider this to outright be a negative because this watch is in no way advertised for any real physical activity. Just looking at it, it is obvious that this is meant to be a dress watch. A watch that’s slim, minimal and will look good with a dress shirt and suit. Wanting to dive with it would be asking more than it’s purpose.

ASSASSIN_S005_S001_T025.jpg

The second possible negative would be the use of a mineral crystal. For watches, the standard for the crystal is of course sapphire. Sapphire is among the hardest materials and is extremely scratch resistant, second only to diamond. This just means that a mineral crystal is not as good. I find that this is a valid concern, but one hard to make considering the price of the watch. Strictly speaking for myself, because this is a relatively cheap watch, it will likely take some abuse. This is a watch that I’m more inclined to wear on days where I’m doing physical activities. Activities that may damage a watch and scratch the crystal. This is simply because of the price. If I were to damage a watch, I would rather damage a watch that cost me $82 than one that cost hundreds or thousands of dollars. Even though I don’t want it to damage, I think subconsciously I’ll be a bit more careless with it. Because of this, I would’ve definitely preferred a sapphire but again, I can’t really complain considering how relatively cheap this watch is.

With a quartz watch, it’s somewhat difficult to say that a particular piece is of good value because quartz watches can be had for so little. That just means that the value is in the eye of the beholder. For me, this watch is absolutely worth it. It’s very elegant and, in my opinion, looks like it costs more than it actually does. If you’re looking for a simple dress watch under $100, I think that you should seriously consider this timepiece.


If you're considering on buying any of the products mentioned, please support my work by using the links below.

Citizen AO9000-06B Stainless Steel Watch https://amzn.to/2WsZLic

Citizen AO9003-08E Rose Gold Watch https://amzn.to/2WE8rXR


Want to support my work?

Consider visiting the shop and buying "Absolutely Nothing"

https://www.TheUpperLeftUSA.com/shop/absolutely-nothing

or

Become a Patron!

https://www.patreon.com/HaiHoangTran

BluShark AlphaPremier NATO Straps


NATO straps have come to be known as a cheap alternative watch band. It’s now something that you can buy multiple of without worrying too much about the price. To achieve this, most companies that sell NATO straps stick around the $15 per strap price range or cheaper. For me personally, this is a price that I’m comfortable with and allows me to essentially buy a different strap for every day of the week. BluShark, however, has moved away from this by introducing their AlphaPremier collection which costs about $36 per strap. The question is, is it worth it?

First, let’s take a look at the materials of the strap. The BluShark website claims that the AlphaPremier collection combines the best features of all BluShark collections to create their highest quality nylon strap to date. To me, this is the main reason for buying the AlphaPremier. You are paying for the upgraded, more premium nylon. For me personally, the AlphaPremier provides the best, most comfortable feel of all my NATO straps and that’s attributed to this nylon. There is a stark, night and day difference between this material and that on my other straps. In terms of the comfort of the nylon, I have no other NATO straps that even comes close to the AlphaPremier. As you can see, the nylon weave is extremely tight and this helps the strap to be very smooth. This very much so feels like a seat belt, in terms of smoothness, but it’s softer. You can easily glide your fingers across the surface and not make out the individual threads. This is in contrast to the cheaper and more traditional nylon featured on other NATO straps, where you can feel the individual ridges of the strap.

The strap itself measures in at 11.4 inches in length and 1.2mm thick. In terms of dimensions, this is just a slight bit shorter and thinner than what I’m used to but that’s not a bad thing. On my 6 3/4 inch wrist, I find that the length provides plenty of room for adjustment and still enough of a tag end to tuck the excess without it looking weird. As far as the thinness, I would say that I’ve not even noticed it but that’s because I typically wear a NATO strap that’s 1.25mm in thickness. That’s a .05mm difference so very minimal and almost indistinguishable. However, if you’re used to a thicker strap, switching to the AlphaPremier may be a big advantage because the thinner straps do add to the comfort over time.

When it comes to the nylon, for me, it is important for the strap to be reinforced in the areas that have been cut and are exposed. This means at the sizing holes and at the tail corner. If these locations are not reinforced, over time and with normal use, these areas will begin to fray and this is likely the biggest reason for needing a new strap. It may be difficult to see, but the AlphaPremier does feature these reinforcements. All of the holes are stiff and so is the tail where the material has been cut. This should help to prevent these areas from getting any fraying and help the strap last longer.

In terms of hardware, the AlphaPremier is held together by what BluShark calls premium stainless steel. What I appreciate about the hardware is that BluShark allows buyers to have the choice of either a premium polished or premium brushed finish. This allows the buyers to match the straps to their watch case on another level. This option is something that I’ve only seen a few brands offer and only with BluShark when it comes to NATO straps. This is something that I really appreciate and definitely took advantage of just to make things match that much better.

Another thing to note about the hardware is that with some of the BluShark NATOS, one of the keeper is left unstitched and this allows it to slide freely. This is implemented for a more practical design. When you wear the strap, the floating keeper allows you more easily lock the excess strap end down. With straps that stitch all of the keeps down, you sometimes run into the issue of just having the excess strap hang. This is such a minor thing but can make a big difference in use.

Lastly, I’d like to talk about the shape of the keepers themselves. As you can see, these keepers are actually thicker and more squared off than what you get with the typical NATO strap. I personally do not like the thinner circular keepers. Because of their size and shape, they tend to fall over and rest against the strap. This means that when you want to use them, you’ll have to manually lift them up and that just wastes time. BluShark’s thicker, more squared off keepers, on the other hand, never fall over. They’re always upright and ready to go. Again, this is a minor detail but adds to the overall value of the product. To me, this is what the AlphaPremier collection from BluShark is all about, little refinements that actually add up to create something that may not have even realized that you needed.

At the beginning of this blog I asked if the BluShark AlphaPremier is worth the $36 per strap. Well, that’s kind of hard to say because it is kind of hard to justify spending more than double what you would with a competitor, but most competitors are not going to provide you with the quality and little refinements that BluShark AlphaPremier does. In this sense, the AlphaPremier is in a league of its own. It’s doing something that most other companies are not offering. If you want the choice between premium polished or premium brushed keepers, a floating keeper or squared off keepers, you should definitely be looking at BluShark. But to be realistic, BluShark does offer a few other collections that feature these things but at a lower price. The main thing that you are paying for with the AlphaPremier is the upgraded more premium nylon. You have to ask yourself if the highest level of comfort is important to you. If it is, the BluShark AlphaPremier is absolutely worth the money.


BluShark was kind enough to send me 3 AlphaPremier straps for review. I’m not obligated to say anything about the product. My opinions are my own and they are how I truly feel about the product.

https://www.blusharkstraps.com/

BluShark Nato Straps https://amzn.to/2H9JmuN

BluShark AlphaPremier Ultra Luxury Straps https://www.blusharkstraps.com/collections/alphapremier


Want to support my work?

Consider visiting the shop and buying "Absolutely Nothing"

https://www.TheUpperLeftUSA.com/shop/absolutely-nothing

or

Become a Patron!

https://www.patreon.com/HaiHoangTran

How I planned to photograph the Wreck of the Peter Iredale

As you can see by the linked video above, I recently went and tried to photograph the Peter Iredale shipwreck in Warrenton, Oregon. This was a planned spontaneous trip. That’s completely contradictory but let me explain. I had a 3 day window to make this trip happened so in that sense, the trip was planned. Other than that, I had no idea when I was actually going to go because there were specific conditions that I was looking forward to photographing. In this blog, I’ll lay out the things that I considered and maybe that’ll help you out on your own adventure.

IMG_A853864C8EA4-1.jpeg


When it comes to timing my photography, the attached screenshot pretty much says it all. Tide schedule, sunrise/sunset times and cloud coverage. These are the 3 most important environmental factors that I consider when doing landscape photography. Realistically, the tides only come into play in some scenarios because they only have a big effect when photographing near large bodies of water. The other 2, are hypercritical. Nevertheless, I’ll cover all 3 factors and how they effect my photography.

First, the tides. Again, this is only something to consider when photographing near large bodies of water. Since the Peter Iredale sits on a beach right next to the Pacific Ocean, the tides can have some drastic effects on the composition. For this location, I knew that I wanted a composition with high tide. I’ve seen photos of the Peter Iredale in low tide and it’s not exactly the prettiest site. The Peter Iredale has been shipwrecked for over 100 years. Spending all that time in salt water did not treat the ship well. It is completely rusted over and there is very little left of it. In low tide, I think it just looks like large scrape metal siting in the sand. However, the rising tide really provides a whole new prospective to the subject. The tides provide a surface for reflections and adds some movement to the scene. It just makes the entire location so much more interesting. Because of this, I had to make sure that I was photographing near one of the high tide times, 11:16AM or 10:48PM.

Next, I had to align the high tide times with sunrise or sunset. This should be obvious. Most photographers would say that the best light is going to be around sunrise and sunset. These times provide that soft light that just seems to make any subject look better and, of course, once in awhile we get some fantastical colors that can really only be seen around these times. I typically am a sunrise shooter and never go at sunset unless I’m already at the location. If it’s a planned trip, I almost always go at sunrise. This is simply because there are going to be much less people around. At sunset, most people are going to be awake and exploring. This just means that tourist attractions like the Peter Iredale are going to be flooded with people. People who will walk into the composition and interrupt my work. I’d rather just avoid this and go at sunrise when very few people are going to be interested enough in anything to actually make the effort of waking up that early. However, to me, the Peter Iredale is a sunset location. If you track the sun movement pattern at this location, you will see that the sun rises over land and sets over the ocean. Considering that I’m looking for high tide, it’s going to be much easier to stand on land, shooting sunset over the ocean than standing in the ocean and shooting sunrise over land. It’s also important to note that most of the crazy colors that we see during sunrise/sunset is going to be near the sun. So in this case, it just makes sense to go at sunset because the sun and possible crazy sunset colors will be over the ocean, which happens to be the direction that I was photographing to capture the high tide. See? It all comes together.

Lastly, cloud coverage. Clouds contribute to the overall lighting but most importantly on this shoot, sunset conditions. Getting those fantastic sunrise/sunsets are tricky. The conditions have to be just right or you’ll just get the very typical yellow sunrise/sunset. A big determiner is the cloud coverage. There’s a lot that goes into this so I’ll try to make it as simple and straight forward as possible. There are various types of clouds and they sit in different sections of the sky. Some clouds offer a better chance of a great sunrise/sunset than others. For the sake of simplicity, let’s just consider that there are low, medium and high clouds. Low clouds are generally bad for sunrise/sunsets. Low clouds are low in the sky and sit near the horizon. This is also where the sun rises and sets. So if there is a lot of low clouds, the sun will be blocked and there will be no fantastic sunrise/sunset. Ideally, we want medium and high clouds but there is a thing as having too little or too much of any. On the day that I photographed the Peter Iredale, there were no medium or high clouds, just a lot of low clouds. Believe it or not, this was actually the most favorable forecast for the days that I could go. On other days, there was predicted 100% low cloud coverage so I knew that there was no chance of a sunset. Still, predicted 88% low cloud coverage isn’t ideal and that really effected my images negatively.

And that’s just about everything that I considered in terms of atmospheric conditions for this shoot. The things that I’ve laid out can effect most outdoor photography situations so it’s helpful to understand them. Next time you go out, take some time to look at the various condition forecasts. Take note of what they are and how they effected your photography. After some time, you’ll be able to understand what everything means and what to look for. All of that being said, it’s more important to just get out and shoot. Get the practice in. Don’t get caught up in planning for the best conditions and prevent yourself from going out on a possibly bad condition day. Remember that the forecasts are largely predictions and estimates. Conditions constantly change. You never know when that crazy sunrise/sunset is going to happen. So get out as much as possible.


Want to support my work?

Consider visiting the shop and buying "Absolutely Nothing"

https://www.TheUpperLeftUSA.com/shop/absolutely-nothing

or

Become a Patron!

https://www.patreon.com/HaiHoangTran