CarPro Iron X vs Adam’s Iron Remover

When it comes to iron removers, CarPro Iron X is pretty much the de facto. It is the most commonly known and likely the most recommended when searching for this type of product. Because of these things, Iron X was the first iron remover that I ever purchased and the only one that I’ve ever used. I’ve tried it, it works and that’s that. However, there is one major drawback with Iron X and that is its price. This led me to look for something different and my search led me to Adam’s Iron Remover. So, is Iron X worth the price of is something like Adam’s Iron Remover just as good for about a fourth of the price? Watch the video above to see how I feel.


If you're considering buying any of the products mentioned, please support my work by using the links below.


CarPro Iron X https://amzn.to/37hZ7tq
Adam’s Iron Remover https://amzn.to/31L6acO


Want to support my work?

Consider visiting the shop and buying "Absolutely Nothing"
https://www.HaiHoangTran.com/shop/absolutely-nothing

or

Become a Patron!
https://www.patreon.com/HaiHoangTran

or

PayPal
https://www.PayPal.me/HaiHoangTran

or

Just shop on Amazon via this link!
https://amzn.to/2FgsDnG

Porter Falls - Capitol State Forest


IMG_6866.jpeg

This year, I plan to get in as much hiking as possible. The original goal was one hike a week, which means 52 hikes total. This quickly changed to at least 26 or about one every other week because I knew that there would be weeks where I wouldn’t be able to hike. There will also be weeks where I’ll be able to hike multiple times.

For my first hike of the year, I went to Capitol State Forest and hiked to Porter Falls.

I started the hike at about 11 AM. There were 4 other cars at the trailhead but I didn't see anyone around. A few other cars were parked sporadically on the road but I have no idea what they were doing because they parked quite far from the trailhead. Even though there were a few cars at the trailhead, I only saw two people on the trail. 

The park is pretty accessible but can be problematic for some. The main difficulty of the drive resulted from the condition of the park’s roads. Once you hit the park's land, it's almost all gravel roads until you hit the trailhead. Mixed in with the gravel were rocks but they were small and manageable. The main annoyance came from all the potholes. It didn’t help that it's been raining because the potholes were essentially all filled with water so it was hard to gauge their depth. On this day, there were a few fallen branches on the road but nothing big. They were easily driven over. I drove a Toyota Corolla on this trip and was able to pretty much dodge or drive over all obstacles. That being said and if I could go back, I would've taken my truck. Having something with decent ground clearance would've made going through the park’s roads much easier and faster.

IMG_6872.jpeg

As far as the hike, it's very manageable. About one mile each way with little elevation gain. Going to the falls, it seemed like all the elevation gain was at the beginning. Coming back, all the elevation gain was near the falls. 

The trail was in overall good condition. It was mostly clear and easily navigable. There was only one stretch of land that was covered in mud. Some of it was enough to suck your shoes in. There wasn’t much dodging it unless you go out of your way off-trail. At this time of year, waterproof shoes are definitely recommended.

Porter Falls itself was ok. Prior to doing the hike, I did some minor research to see what the area looked like. Some people posted pictures showing the falls as large and grand. Others show something tiny. To me, it isn't one of those giant waterfalls but more of a small drop. It’s probably only 10-15 feet tall. Still, it was a pretty nice place to be. The fallen trees really added to the scenery for me. 

IMG_6903.jpeg

Overall, I think the hike makes a worthwhile day trip if you're looking for something short and don't require much effort.

There's one other thing that I wanted to note. Walking on the trail I kept hearing engines rev as if people were racing down the roads. Getting back to the parking lot, there was a group of people with their quads. They were speeding around the parked cars. The parking space is essentially dirt and gravel so you can imagine all that being picked up and thrown at the parked cars as they raced by. Extremely inconsiderate. I doubt this is the norm but it obviously does happen. 

For me, aside from the inconsiderate people at the parking lot, it was an overall enjoyable experience. I don't know if I would do the hike again, but I think it's worth a one time try. 

B9806DE5-D081-4AA0-93A7-464BD1E3D168-1.jpeg


Want to support my work?

Consider visiting the shop and buying "Absolutely Nothing"
https://www.HaiHoangTran.com/shop/absolutely-nothing

or

Become a Patron!
https://www.patreon.com/HaiHoangTran

or

PayPal
https://www.PayPal.me/HaiHoangTran

or

Just shop on Amazon via this link!
https://amzn.to/2FgsDnG

Sirui 3T-15 vs 3T-35K

Over the last few months, I’ve been testing out two tripods, the Sirui 3T-15 and 3T-35. These are two very popular tabletop tripod options and prior to getting both, I was torn between one or the other. So, in this post, I’d like to share my thoughts on both with you in hopes of helping you make an educated buying decision.

First, let’s look at the design of these tripods.

Of the two, I would say that the 3T-15 has a more traditional tripod design. It’s essentially a set of legs with a ballhead. It doesn’t do anything special but that’s not a bad thing. Because it doesn’t have special features, it doesn’t require a bunch of special parts. The construction of the 3T-15 is simple yet extremely robust. This thing just feels like a tank but it is surprisingly the lighter weight of the two. In terms of construction, this one feels of better quality. In terms of design, everything is streamlined and in my opinion, the 3T-15 is the better-looking tripod of the two. This looks like a complete product as if everything belonged together.

Next, the 3T-35. This is definitely the more interesting design of the two options. The main thing that makes this tripod different from the 3T-15 is the center column. This allows you to get some additional height when in tripod mode and when held, it’s actually long enough to be a pretty functional selfie stick. The center column features two different sections and has the ability to extend. This allows for a little more height in tripod mode and an even longer selfie stick. If you don’t want the height and just want a more traditional design like the 3T-15, then you can just remove the entire center column. This reduces the size quite a bit and makes the setup very compact but to be honest if I’m buying this tripod, I’m buying it for the center column. That is the main appeal of this tripod. Also, removing the center column isn’t exactly an effortless task. It requires a tool and takes a moment to remove. In a pinch and if you absolutely need a really low angle shot then sure, remove the center column. Just make sure to bring the hex key along or you’ll be out of luck. For me, the process is not practical so I always keep the center column on. That being said, there is one major drawback to this design. As with any other tripod, the center column does make the tripod less stable and not as sturdy. Whereas the 3T-15 can support 11 lbs, the 3T-35 can only support 8.8 lbs. Remember, these are the recommended max payloads so you should really use a rig that weighs less but still, the 3T-15 will be able to support a greater payload. With a camera mounted to the tripods, you can definitely tell that the 3T-15 provides the more stable platform and this makes sense. The center of gravity of the camera is lower when on the 3T-15 than 3T-35. They may be more similar, in terms of stability, if the center column is removed from the 3T-35, but again, that’s just not how I use this tripod.

If you are watching this video and are interested in buying one or the other and are hoping that there’s an outright winner than I’m sorry to break it to you because there just isn’t. These two tripods have different purposes and are geared towards different users. The 3T-15 is a simple, straight forward tabletop tripod. It has no frills but feels extremely robust and looks great. It provides the a more stable platform out the box and can support a greater payload. The 3T-35 is a bit of a chameleon. It’s multi-purpose. It can be a plain tabletop tripod like the 3T-15 when the center column is removed or with the center column, you get a taller table tripod and a very functional selfie stick. Not to say that you can’t use the 3T-15 to get a little extra reach, but the 3T-35 is just more useful as a selfie stick if you do not have a particularly wide lens. The main drawback, for me, with the 3T-35 is its perceived robustness. The specs say that it can hold 8.8 lbs but I don’t know if I really believe that. I mean 8.8 lbs is more than a body and a 70-200mm f/2.8. Would you throw that kind of setup on this thing? Probably not. The 3T-15 on the other hand, the specs say that its load capacity is 11 lb and I don’t know if I would want to test that but, I have an easier time believing it. Realistically, a tripod is only as strong as its individual components whether its the head or the legs. You can have a set of legs that can carry 100 lbs but if the head can only hold 1 lb, then the whole setup only holds 1 lb. The 3T-15’s head is so much beefier than the 3T-35’s head. Because of this, I think the 3T-35 would be an excellent option for a smaller setup. If you use a point and shoot, micro 4/3, APS-C or a small, lightweight full-frame setup, then the 3T-35 is an extremely versatile option. If you have a heavier setup or just have no need for the center column, go with the 3T-15. It’s extremely well built and will more likely hold up to the test of time.

It should also be noted that there is also a 3T-35 Plus model which costs a few dollars more than the standard 3T-35. I’m not exactly sure what’s different but the Plus model is advertised as having a C-10S ballhead. The C-10S head essentially gives you all of the functions of the 3T-15’s head but can’t support the same payload. Aside from this, there isn’t much difference. The specs show that the Plus is a bit larger in size and has a bit more maximum working height but this could just be because the C-10S head is a bit larger. The Plus is a few grams lighter than the original. Other than that, the two are very similar.


If you're considering buying any of the products mentioned, please support my work by using the links below.

Sirui 3T-15K https://amzn.to/2Zl20W5

Sirui 3T-35 https://amzn.to/2ZdnkNj

Sirui 3T-35 Plus https://amzn.to/2vIWl3f


Want to support my work?

Consider visiting the shop and buying "Absolutely Nothing"
https://www.HaiHoangTran.com/shop/absolutely-nothing

or

Become a Patron!
https://www.patreon.com/HaiHoangTran

or

PayPal
https://www.PayPal.me/HaiHoangTran

or

Just shop on Amazon via this link!
https://amzn.to/2FgsDnG

Jollylook the WORST Instax Mini Camera

I was recently sent the Jollylook, the self-proclaimed first cardboard vintage instant film camera.

Needless to say, I was interested. I’ve been a fan of FujiFilm Instax and instant film in general for a while now. Those who have been with my YouTube channel for a long time will know that I’ve reviewed a few Instax cameras so I’m familiar with this genre of photography.

Using instant film is already vintage in a sense but what Jollylook has developed is next level vintage. They took the modern Instax mini film and made it work with a camera that looks like it’s a hundred years old. This is largely attributed to using a camera with bellows. Nevertheless, this is something very different from what every other Instax camera manufacturer is doing.

On the surface and while looking at the marketing, this seems to be a pretty cool camera. But let me tell you, problems arose immediately upon unboxing. Let’s first look at this camera in terms of construction. A major part of the Jollylook marketing is that it is made of cardboard. Now, I was never really excited about this because well, cardboard. This is a material that has a lot of drawbacks and weaknesses. Getting the Jollylook in hand, it’s apparent that it’s actually made from a variety of different materials including cardboard, vinyl, wood and metal. But it is largely cardboard wrapped in what I assume is a type of leatherette vinyl. My first issue with construction is that it seems like everything is glued together and some of the surfaces were already separating upon unboxing. The glue is just not holding up. I looked past this and actually tried to use the camera and this is where the issues really snowballed.

The process of actually using the camera is not a complicated one, but it is one that requires a few steps. The camera comes with instructions and the manufacturer has made an instructional video showing how to use the camera but you can’t understand the frustration until you try it yourself.

Scan 1.jpg

I’ve included a copy of the instructions for you to check out for yourself. I’ll just add some thoughts about them.

  • The bellows DO NOT work properly. Its length is just too short or the wrong material was used because when the lens panel is pulled out, the bellows just want to pull everything back into the camera body. If you look up #jollylook on Instagram, you actually see that some people put a stick in between the bellows just to make it properly extend. *UPDATE* It seems like this stick was previously included with the camera. I did not receive it along with other parts that I’ve seen. I can’t say that this was a mistake or the norm for current cameras that are sold.

  • The lens panel DOES NOT fit properly into the cutouts on the distance scale. The cutout is too small to fit the wood edges of the lens panel. Every time that I try to adjust the distance, I feel like I have to jam the edges of the lens panel into the distance scale. Over time, this section is likely going to be destroyed from use.

  • The diaphragm or aperture changing mechanism is just terrible. It’s very stiff and I feel that I have to put way too much force into adjusting it. This is likely going to take some damage after some use.

  • The viewfinder is extremely inaccurate. It gives you a rough idea of what you are shooting, but the final result will be greatly different from what you saw in the viewfinder.

  • The crank mechanism to advance the film is extremely inaccurate. It’s very difficult to know when to stop turning the handle. On multiple occasions, I’ve advanced too much and another film comes out. There is supposed to be a click that signifies when to stop but I never hear/feel it.

Scan 2.jpg

After taking a few photos with this camera, I quickly learned that it doesn’t work. All my photos turned out black. This could be for a variety of reasons.

  1. The camera doesn’t work.

  2. Because the bellows don’t fully extend, light doesn’t travel through it properly and doesn’t produce a proper exposure.

  3. The shutter mechanism is defective. Its timing could be wildly off and contributes to an improper exposure.

  4. The film advance mechanism is doing something to not expose the film properly. Some films could be partially advanced which means that it’s partially exposed.

  5. The diaphragm or aperture is just too small, even at its widest, to actually let light in. I felt that this was the most plausible reason. I didn’t want to just say that the Jollylook just didn’t work. Maybe, there just wasn’t enough light in the particular room that I was in. To test this, I straight up took a picture of a light fixture. This would no doubt be enough light but guess what? I got nothing but the highlights of the lightbulbs. I tried again with another light fixture and essentially got the same result. To not get too deep into how a camera works, I’m just going to say that this camera needs A LOT of light. I’m talking about the brightest of summer days. If you try to take an indoor photo, it’s done. You won’t get anything but a black photo. Forget about the diaphragm guide or even changing it. You’re basically shooting yourself in the foot if you try to reduce the light by closing that diaphragm at all.

So, what more can I say? This is absolutely the worst, not just Instax, but camera, in general, that I’ve ever used. What’s crazy is that this thing is sold for $70. That’s not including film. On the other hand, something like the Fujifilm Instax Mini 9 costs around $50 and very often comes packaged with film. The Mini 9 is straight forward and gives you very consistent results.

Here’s something else for you. When I was contacted about reviewing this camera, the Co-founder of Jollylook gave me some background information about this camera. It was funded on Kickstarter in 2017 but since then, the company has had some financial problems. Instead of shipping these cameras out to the people who supported them on Kickstarter, Jollylook started selling the cameras. I would assume that this is to get some extra money to keep them afloat but apparently, two cameras need to be sold for every one Kickstarter reward fulfilled. Today, 2-3 years later and ONLY 65% of their backers have received their rewards. If you look at the Amazon reviews for this product, one person actually verified this. She said that she backed this project two years ago and still didn’t get it so she just ordered it on Amazon and got it two days later. I was even told that Jollylook is working on a new generation of Jollylook Square. I assume that this is just their version of a camera that uses Instax Square film. Just think about, instead of rewarding the people who backed this product through Kickstarter, they are out here selling these cameras, giving them away for free and even developing something different INSTEAD of giving their original supporters the rewards that they deserve. This just blows my mind.

To all those people who backed this Kickstarter and are still waiting to receive their camera, I really hope that you get it soon. But in all honesty, if what you’re getting is anything like what I got, I would just forget about it. This thing is trash. It’ll look pretty good as an expensive paperweight or shelf art, but as a camera, just buy a traditional Instax camera.


If you're considering buying any of the products mentioned, please support my work by using the links below.
Jollylook Mini Instant Camera https://amzn.to/38m1e0a
Fujifilm Instax Mini 9 https://amzn.to/38rDBTV


Want to support my work?

Consider visiting the shop and buying "Absolutely Nothing"
https://www.HaiHoangTran.com/shop/absolutely-nothing

or

Become a Patron!
https://www.patreon.com/HaiHoangTran

or

PayPal
https://www.PayPal.me/HaiHoangTran

or

Just shop on Amazon via this link!
https://amzn.to/2FgsDnG

WeatherTech Window Deflectors vs AVS Vent Visors for the Toyota Tacoma

I recently purchased the WeatherTech Window Deflectors for my 2020 Toyota Tacoma TRD Pro.

If you’re unfamiliar with this type of product, it goes by window deflectors, rain guards and vent visors. It just depends on what the manufacturers want to call them but all the products serve the same purpose.

There are two types of window deflectors: out-channel and in-channel. Out-channels almost always use adhesive tape to stick on the outer edge of a car’s window. In-channels sit in the channels of the windows and in between the weatherstripping. This is also typically done with adhesive tape but it just depends on the manufacturer’s design.

Now you if you’re wondering what the purpose of the window deflector is, well at the end of the day, it essentially provides a small canopy for your car windows. Imagine that it’s a rainy day and the inside of your windows are fogging up or you just want to get some fresh air. Well, if you open the window, rain is going to come splashing in. The window deflectors allow you to crack the windows while getting protection from the elements. On the opposite end of the spectrum, on a hot summer day, you may want to crack your windows but don’t want to chance someone coming by and messing with your car. Well, again, the window deflectors allow you to crack the windows and let air in while making it less obvious that the windows are cracked and make it harder for anyone to get their fingers in the crack. Aside from these functional uses, the window deflectors also serve as a way to accessorize a vehicle. I personally love the look of them and add them to all my vehicles.

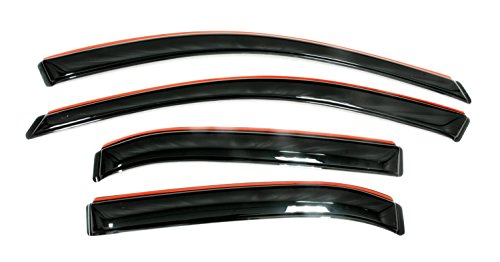
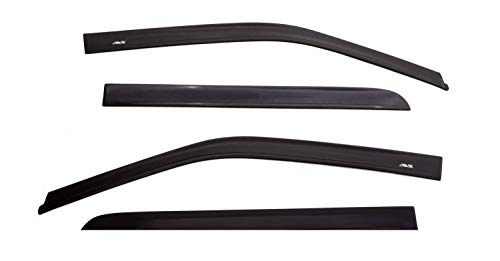
Now, many different companies make window deflectors. In this case, we are taking a look at the WeatherTechs. To be honest, this is the first time that I’ve ever purchased window deflectors from WeatherTech. I’ve always avoided them because WeatherTech typically charges a lot for whatever product they sell. In the case of the window deflectors, the WeatherTechs are the most expensive that I’ve seen on the market. The official website lists them at $99.95 but realistically you have to pay for shipping and taxes so, for me, it comes out to $126.34. This could be 3 to 4, if not more, times more expensive than some of the competition. The most notable other brand for this type of product is going to be Auto Ventshade or AVS. I personally am a fan of AVS vent visors. I’ve had them on all of my other vehicles and to be honest, I wanted them on this Tacoma.

So why not buy the AVS? Well, I did. I bought them FIVE times and even tried to make a video dedicated to them but every time they arrived, there was something wrong with them. All of these window deflectors are basically made from plastic. Although they are very durable and don’t crack easily, they are prone to scratches. With AVS, they decided to package their product by stacking the deflectors on top of each other and shrink wrapping. It doesn’t help that they don’t take the time to round off the edges so some of the deflectors can be sharp. Because of all of this, the vent visors just end up damaging each other. Of the five sets that I purchased, all of them were damaged. The first set had obvious scratches everywhere. The same thing with the second set. By the third time, I said that I was going to install them no matter the damage. Again, they arrived damaged but I attempted to install them anyways. Well, that didn’t turn out too well because one of the deflectors had faulty adhesive tape that didn’t stick, so that set went back. The fourth set arrived and it was worse than all the others. I didn’t even have to remove the packaging and I can see obvious deep gouges everywhere. The fifth set came and like the fourth, it had deep gouges but this time, there were what looked like small pebbles under the shrink wrap. I was done with the AVS and ordered the WeatherTechs. Now, this isn’t just me. I’ll leave a link to the Amazon listing of the AVS vent visors and you can check out the reviews for yourself. There are so many bad reviews because people keep receiving damaged vent visors. It seems like the good conditioned ones are out there, but they are definitely not the norm. But hey, if you don’t mind some damage, you can get the AVS vent visors for a great price. Sometimes there’s a sale and you can pick a set up for around $30.

Again, I’ve never had WeatherTech window deflectors before and I wasn’t sure how they would fair. First of all, they don’t install with adhesive tape but are essentially held in place by the force of the deflectors themselves up front and with clips in the back. There are install videos on YouTube so you can check those out for yourself to understand what I’m talking about.

Prior to buying the WeatherTech window deflectors, there were a few things that I was wondering about and I wanted to go over them in case anybody else who’s interested in this product is wondering the same thing.

First, was the overall size. From images, it seemed like the WeatherTech window deflectors protruded out quite a bit. With AVS you had the choice of two types of vent visors, either the standard or low profile. The standard bubbles out from the window and is a bit more noticeable while the low profile is essentially flat and gives a more factory look as if it belonged on the truck. From pictures, the WeatherTechs seemed like they domed out more than the standard AVS. To my surprise, the WeatherTechs are pretty low profile. In the front, it has to bubble out a bit because of the design that they went with in order to install without adhesive, but the back is super low profile. It’s practically flushed. Up front, there is about one and a half fingers worth of space between the deflectors and the window glass. In the back, it’s pretty much just one finger. The design is very low profile and from my experience with the standard AVS vent visors for this truck, I would say that they are more low profile than those, in the rear for sure.

In terms of design, the WeatherTechs are very different from the AVS, at least up front. The WeatherTechs don’t just run along the top of the window channel but extend all the way down the front edge. With this, I was worried that there may be some visibility issues. I was worried that the deflectors would cover a good bit of the side mirrors. Again, I’m happy to say that this is not the case. On the driver side, there is no obstruction and with how my seat is positioned, the deflector only covers about one centimeter of the very top left most of the passenger side mirror. This is something that would not cause any hindrance at all.

Another thing that I was wondering about with these deflectors is if they increased wind noise. When driving, would wind get caught under the deflectors and add some unwanted noise. Again, I found that there was no such thing. Right after install, I had to drive about 30 miles on the freeway and didn’t notice any difference so that is great.

Finally, I was worried if the WeatherTechs would hinder the window’s ability to roll up. With the set of AVS that I tried to install, I noticed that while rolling the window up, it would often catch on the bottom edge of the deflectors. This is something many Amazon reviewers also mentioned. Some say that the problem went away. I didn’t have them long enough to find out. However, with the WeatherTechs, because the deflectors extend all the way down the front and actually sit outside the window channel, the window is able to roll up and down freely.

At the end of the day and in my opinion, the WeatherTech window deflector is a better product than the AVS vent visors. Is it worth the almost $130 price tag? That’s hard to say and ultimately for you to decide. I myself lean towards no, they are not. If you’re looking for something cheap and functional, try the AVS first. You may get a damaged product but hey, it’s cheap and it works. I didn’t want to pay brand new prices for damaged goods so the AVS were out of the question. I went with the most trusted and expensive option and I would have to say that I’m happy with them.


Auto Ventshade 194768 https://amzn.to/2RqXNyp
Auto Ventshade 994036 Low Profile https://amzn.to/3669HD7
Auto Ventshade 1774036 Low Profile Matte Black Ventvisor https://amzn.to/364rqL1


Want to support my work?

Consider visiting the shop and buying "Absolutely Nothing"
https://www.HaiHoangTran.com/shop/absolutely-nothing

or

Become a Patron!
https://www.patreon.com/HaiHoangTran

or

PayPal
https://www.PayPal.me/HaiHoangTran

or

Just shop on Amazon via this link!
https://amzn.to/2FgsDnG